Lith Bleach and Redevelopment
After my last couple of lith sessions I set abut trying to achieve a warmer tone on the Oriental Seagull paper. It has a pleasant taupe tone to it but it is decidedly olive in color but it has some light creamy pink highlights. In this latest round I experimented with a lith developer with a heavy addition of sea salt. Meant to create some warmer highlights it seemed to do the opposite and left me with more neutral tones. The salt also seemed to restrain the infectious development which was at once frustrating (waiting for it to happen) and rewarding in the that the range of tones in the shadows was more controlled.
Rehalating with Chlorine?
Further thought got me down some logical sounding, though possibly wrong, path towards warmer prints. Since I was enamored now with sea salt I thought if I make a rehalation bleach bath I might be able to substitute sea salt (Almost entirely sodium chloride) for potassium bromide. Rehalation bleaches work by oxidizing the developed (reduced) silver back to a silver halide, usually silver bromide. The bleach is mixed with the halide salt to achieve this. Since this is done on a developed and fixed print the only silver present is where the image is and present in proportion to the density of the area of the image.
The genesis of the idea was in part the thoughts about sea salt in the lith developer but virtually at the same time I ran across a short article by Wolfgang Moersch on his company's website. There are some additional 'secret' articles under 'knowhow' that are in German and as such only available if one hits the German flag button on the home page. I get this article that Bing translates for me to English. It relates the use of bleaches and redevelopment for improving negative densities and is worthy of study for that alone. However I noted his preference for sodium chloride instead of potassium bromide. This is the first I had seen this as every other bleach formula for rehalation used the bromide ion. I went this route as silver chloride is know to produce warmer tones. (Though I am not sure if this is the chemistry or the result of smaller crystals which would mean rehalating with chlorine would not help much.)
The Bleach
This gave me further encouragement. Moersch uses concentrated Acetic acid (vinegar) (which I have none) with his permanganate bleach. I already have the components for permanganate bleach with two parts; Part A 25g Potassium Permanganate in 500ml water and Part B 25ml concentrated sulfuric acid in 500 ml water. I then mix this as 25ml Part A + 25ml Part B + water to make 500ml for a normal bleach. In this instance I made the solution with about 15g of sea salt. I have concerns about this substitution of sulfuric acid for hydrochloric acid. Sulfuric acid and sodium chloride will react to form HCL gas at high temperatures. I am not sure in the presence of potassium permanganate if the bleach does not react sufficiently or if the chloride ions are consumed in the creation of HCl.
I mixed the bleach and applied it to some previous prints I thought to be rejects. I started by first soaking the prints in plain water to allow the bleach to penetrate the emulsion evenly. The first print I immersed for about a minute and it nearly completely bleached away the image except for the deepest blacks. The bleach was very active. There was also a very faint whiff of chlorine gas. Given this reaction I bleached the next more carefully given the strength of the bleach and pulled it when the highlights only had disappeared. Finally I did one for even less time perhaps 10 seconds. All three I washed for several minutes in water.
I then mixed my last batch of Fotospeed lith developer. I had very little concentrate left and made 1 liter of fresh developer with no 'old brown'. There was less developer than I normally use. I then developed the first two bleached prints in this new developer. Because of the developer weakness it took over half an hour to start developing. I did most of it under a safelight and as I got more impatient I turned on lights to look for progress. I don't know if it was a coincidence or not but the development started shortly after the lights came on. I developed to completion.
Once dry there was evident pinker tones in the two prints. Complicating evaluation was the bleach left a yellow stain on the paper borders. The third print I briefly bleached I did not redevelop but left it out in the room lights. All of the image tone returned and it too had a pinker tone to it with none of the staining as it had not been in the bleach for very long..
This leads me to wonder if I actually achieved any actual development but merely printed out the related silver. An easy way to test this would be to re-fix a print to see if the redeveloped image disappears. I did refix the most heavily bleached/developed print and there was not effect on the image.
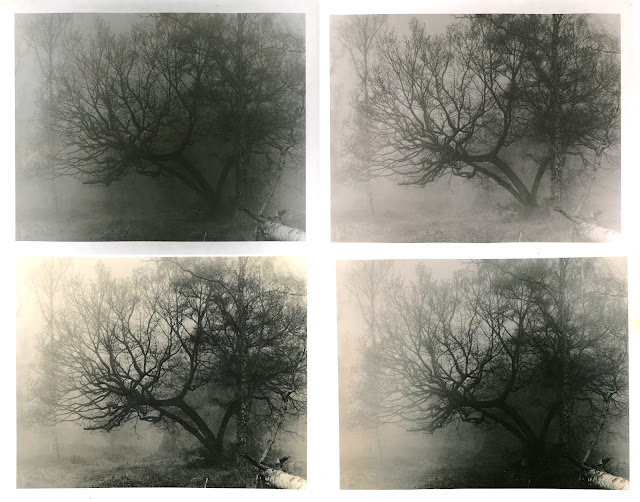
I scanned the three prints and an untouched one and merged them into one Photoshop image. I adjusted the white point to match the untouched print's border to equalize the color. The result is below. The upper left image is the reference print, the upper right is the bleached but undeveloped print, the bottom two are the bleached more thoroughly and redeveloped and exhibit the yellow staining on the borders.
 |
| Bleach Redevelop Results |
 |
| Bleach Redevelop Results with Stain Removed |
Next Steps
Update: Selenium Toning
I ran some simple experiments with selenium toning. I used the 1+3 dilution for maximum effect. I ran 3 test prints. In general if allowed to tone 'to completion' which was over a minute when no more change in density or tone was detected . the selenium tended to obliterate the tones in the shadows just below the mid-tones. This resulted in loss of detail in these areas. There was noticeable increase in the lighter features nearer the highlights however.
The first image was the same s the lower right in the images above. The tone changed to am ore magenta cast as the details in the shadow areas disappeared. There is an abrasion on the print from something I did.
 |
| Selenium 1+3 |
The next one was also toned to completion. The tone moved to a more neutral color. The shadow detail was also lost. It did bring up some delicate highlights nicely in the lighter center of the image. I give before and after versions here...
 |
| Before Toning |
 |
| After Toning Selenium 1+3 |
Finally one I pulled while the tone was still changing and building. The print goes through a phase with more magenta color. I pulled this print early trying to gauge where not too much detail was lost and color was maximized.
 |
| After toning selenium 1+3 pulled early |
Comments