Posts

Showing posts from February, 2019

Evolution of a Print

Image
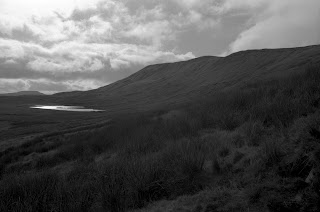
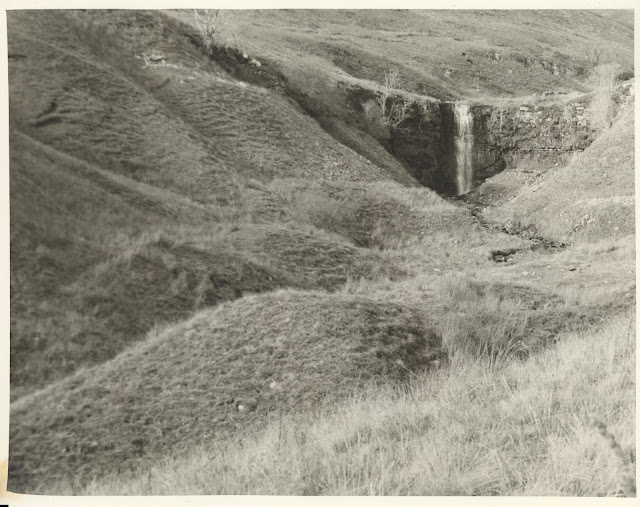
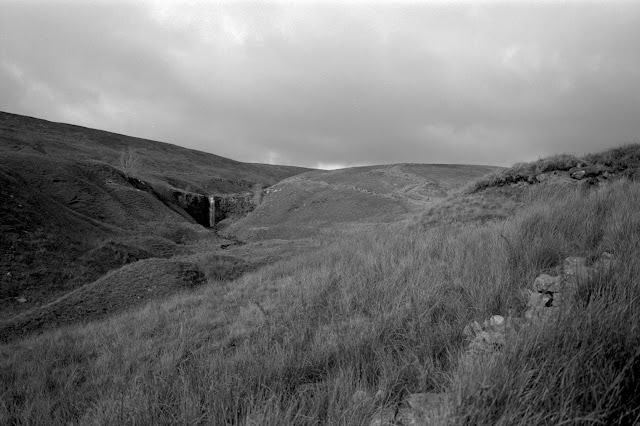
I decided to to try again some of the darkroom printing techniques I outlined in my previous post . In that post I was looking at a couple of different monographs on making fine art prints. In this entry I will look at another print that is somewhat more challenging and show the progress again as I work through the method outlined by Les McClean . Again I start with a 6x9 negative (Ilford FP4+) which I chuck into my 6x6 Meopta 6 enlarger. I select a crop from the left side of the 6x9 negative. This was taken again on a hike up Whernside in the Yorkshire Dales. This is part way up the mountain on a very cold and windy day. A lake lies at the base of the mountains and there are scattered clouds. Original Negative I deviated slightly from Les McClean's method in that I made a couple short test strips in the hard and soft filters to see where the basic exposure lay. I did this at f11 as a guess. This crop is not so tight as the one in my previous post and so the enlarger head is

Bringing my Printing to the Next Level

Image
To The Next Level?  I have been spending the last several months thinking about how to bring my photography up to a new level. I could be accused of being somewhat lazy in my photography. I used a meter to set the exposure of the scene, I developed my black and white film using Massive Dev Chart. I worked on focus, composition and basic exposure to achieve my results. Over time my photography has improved but in some ways I reached a plateau. I think this happens with everyone and one needs to motivate or be motivated to swim out of the stagnant Sargasso sea of complacency. I have embarked on some improvements which I can roughly outline below. Better exposures in color and black and white. Improve color workflow especially color negative film. Understand and embrace the zone system more. Think about the creative process more intentionally. Understand the roots of aesthetics. Improve my darkroom practices to make better prints. Improving Exposures I have always liked chr

In Praise of Parallax Photographic Coop

Image
I stumbled across  Parallax Photographic Coop   about 6 months ago. Based in London I tried them out on a trial order and found them to be a pleasure to work with. Their prices are very competitive and the service is excellent. They have become my go-to online source for analog photographic materials. For items like film, paper, and developer they have a very good range to select from Paper Ilford FB and RC papers  Foma FB and RC papers  Fuji Crystal color paper Film  B and W Kodak, Ilford, Fuji, Foma, others 35mm, 120, 4x5, 8x10 (Foma) Color, Kodak, Fuji, Cinestill, 35mm, 120, 4x5  Instant films Chemicals (B and W/Color) Ilford, Kodak, Foma, Tetenal Developer Stop Fix Alternative Process (Argyrotype, Cyanotype, etc) Accessories Books I encourage you to give them a try. They are based in Brixton (london) a short walk from Brixton tube station. I visited them on a vile day (tipping it down!) while on a business trip to London. A little tricky to find (Look for

More Darkroom Time

Image
Gosh I am having a great time again in the darkroom. After a long hiatus and seemingly unable to get motivated in that direction the last week has been close to continuous activity as evidenced by the last 4 blog posts. Part of it was clearing out the shared space of the darkroom which I share with the laundry room. It is also realizing that my basic skills don't fail. That is not to say I am terribly talented here but I believe I am competent and consistent in practice as well as results. That makes a huge difference. I have been learning this since 2013 when I bought my first enlarger.  For those new to it keep up the work. Once the habits and learnings are in place then the ease enhances the joy. I can attribute some of this joy to my automated setup for split grade printing. It eases some of the monotony and reduces errors. That being said the time alone can also be contemplative. My first day back this week, I discovered that my Fomabrom Variant 123 pack of 12x16 paper w

Prints of Force Gill Whernside Yorkshire Dales

Image
This past October my wife and I visited the Yorkshire Dales as outlined in this post . I have  finally gotten around to making some prints in the darkroom from this trip. This is Force Gill on Whernside the highest point in Yorkshire. It was taken with my Fuji GSW 690 6x9 medium format rangefinder camera on Ilford FP4+, developed with HC-110 dilution B single shot. I was a bit lazy however and decided to print it in my downstairs darkroom (I know how luxurious it sounds to have two darkrooms!) which means my Meopta 6x6 enlarger. The Beast upstairs can handle the 6x9 negative but it is a bit limited in that it has no wet-side and I must haul my exposed paper downstairs in a light-tight tube to develop the prints. (See not really luxurious at all!)  So I opted to crop 6x6 out of 6x9 and this changes the image markedly. Below is the original image from the scanned negative. As I noted before in my best of 2018 post,  I liked this wide angle shot as it makes the waterfall fit into

Back to the Darkroom:Update

Image
Reflecting on my original post and my complaint about the thinness of the negative I decided I should  try and intensify the negative. There are many ways to to this including a very old technique of using Mercury Chloride (not a good idea!), Chromium, Sepia toner, ot Selenium toner. Fotospeed makes a Chromium intensifier intended for darkening thin negatives. I have never tried this but this is one way to go.  Andrew Sanderson's excellent blog has instructions on using Sepia toner . This involves bleaching then toning the negative. He does a great show and tell to explain the process.  Finally I use Selenium toner. Why? Mostly because I already have Selenium toner mixed up for my printing use. It is also dead simple. Just dunk the negative into selenium mixed a 1+3.  I give it about 3 minutes. I get anywhere from a 1/2 stop to full stop improvement.  I gave a short write up here but realized though I was satisfied with the improvement I didn't show side-by-side examp

Back in the Darkroom! Iron Blue Toning Prints

Image
After my session in the darkroom I wanted to experiment with some Iron Blue toning. (See my previous post for details.) Wolfgang Moersh's work inspired me to take a further look. I brought out his MT7 Iron Blue toning kit and mixed some fresh chemistry. On his photos on Flickr he gives some of his recipes. The one I used was 2+2+5+2 with 500ml of water. In his system the numbers are milliliters of Part 1, 2, 3, and 4 respectively. I decided to use the 8x10 prints to experiment with. These are all printed on Kentmere VC Select RC paper. The chemicals are mixed with the water and I poured about half into the tray to cover my first print. This was a print I had made with suspected expired developer but was probably OK. I let it run for about 3 minutes in the toner. I would let the toner wash over the print and prop up the tray to let it drain. This lets me assess the degree of color change. The next I did for 2 minutes though it was a darker print and finally for 1 minute for a

Back in the Darkroom!

Image
I haven't been in the darkroom for some time. I did a brief stint (2 prints) in November on the Beast my 4x5 enlarger. This lead me to work on some missing negative holders the subject of a post back then.  So this weekend I spent several hours printing and found it enjoyable again. The process has a start, some lessons and a few pleasing results.  Getting Me Started Again (Thanks Wolfgang!)  The beginning of this session I suppose was my visit to British Columbia to see my son last December. We went out walking and he indulged me by letting me take photographs as we talked and caught up. I had decided to try some Foma Retropan 320 to see if I could make it my high speed black and white film. The results made me decide not but I still got some decent photos from the visit.  Later I 'faved' a photo from Wolfgang Moersch. Wolfgang sells his own chemistry for film and paper and I can attest to the quality of his products. I use his paper developer Eco 4812 al

Lynwood Arboretum: A couple of 4x5 photos.

Image
A couple of weeks ago I was getting a little antsy that I hadn't been doing much photography in a while. I had some time to myself and so I set out to Lynwood Arboretum where my wife and I had visited a few weeks earlier. It wasn't a particularly special day for photography, it was a little rainy and broken weather but I felt I needed to do something to keep my skills and habits from getting too rusty. Lynwood Arboretum is on the edge of the Fens in East Anglia. The Fens, which I have to drive through are unremittingly flat. They are reclaimed wetlands with works beginning at the time of Charles II. Using the help of the Dutch, a vast area was eventually drained and reclaimed to be rich farm land. Now my family stock come from Iowa and Illinois in the Midwestern USA but there are areas of the Fens that rival these places in terms of flatness if not scale. On the way to the Arboretum I did stop an take what I hope will be a good representation of this landscape on my Fuji G

A Few Words on Wilderness

Image
In a previous post I contemplated the nature of wilderness and isolation. Having grown up in Flagstaff Arizona and having lived on the edge of the National Forest I had ready access to wilderness and isolation. I was a shy and introverted kid at the time. Tall and skinny, always with long hair. The awkwardness of those pre-teen years assuaged by the quiet forest, the sounds of wind in the ponderosa, the call of the Steller's Jay, that dry pine scent-filled air of northern Arizona. For hours after school and on weekends I wandered this patch of wood and knew every aspect of it. The place we buried our family dog. Where a skinned mountain lion was lying stiff, red-muscled in the grass, and then days later not a trace. Elk or deer stalked, then startled, bolting and bounding through the woods over the gray dead trees with their yellow pitch-striated knots. The hidden delicate vanilla smell of the ponderosa pine when a nose is pressed into its cracked bark.  On warm days the richer s