I decided to to try again some of the darkroom printing techniques I outlined in my previous
post. In that post I was looking at a couple of different monographs on making fine art prints. In this entry I will look at another print that is somewhat more challenging and show the progress again as I work through the method outlined by
Les McClean.
Again I start with a 6x9 negative (Ilford FP4+) which I chuck into my 6x6 Meopta 6 enlarger. I select a crop from the left side of the 6x9 negative. This was taken again on a hike up Whernside in the Yorkshire Dales. This is part way up the mountain on a very cold and windy day. A lake lies at the base of the mountains and there are scattered clouds.
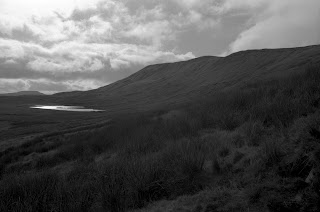 |
| Original Negative |
I deviated slightly from Les McClean's method in that I made a couple short test strips in the hard and soft filters to see where the basic exposure lay. I did this at f11 as a guess. This crop is not so tight as the one in my previous post and so the enlarger head is much closer to the paper meaning I need to stop down more. This warm tone paper is also very slow. Below is a scan of the two test strips (soft is the middle one and hard is the right one). There is also another long strip on the left with lines penned on it which will come into play later.
 |
| Test strips. Hard filter on right Soft filter middle. (f11) |
These test strips, particularly the hard filter strip, show I need to open a stop. The two visible sections on the bottom of the hard strip are at 64 and 45 seconds going up. So I learn from this I should use f8. The soft strip in the middle has values of 64, 45, 32, 22, 16, 11, 8 from bottom to top. The test strips were exposed at the hill/sky juncture. That line is what you can see in the middle of the strip. It is clear the sky (white on left of the strips) is very much brighter and this will represent a challenge. I took for the soft filter an initial guess of 45 seconds at f11 which translates to 22 at f8 (1/2 the light at 1 stop).
From this I made my first test print with the #0 filter at 22 seconds and 1/2 stop steps of exposure on the #5 filter. The first strip on the right is no #5 exposure then it runs 8, 11, 16, 22, 32, 45, 64 seconds towards the right.
 |
| Test1 f8 #5 steps #0 22 sec |
From this I judged my base as too light so added 1/4 stop of exposure (27 sec) and decided on #5 filter at 16 seconds (fourth band from the right) for the next test print. Note that I only pick up a little of the sky detail on the left of the print with the extreme hard filter exposure. I will deal with this later as I will need to burn this in more. Going back to the previous post remember the ideal is to add exposure to the image. If I were to focus on the sky and get that right then I would be dodging the hillside which in principle we want to avoid.
 |
| Test2 f8 #5 16 sec #0 27 sec |
From here I decided the grasses in the foreground are a little too dark so on the next test I would take down the #0 filter to 19 seconds. At this point I decide to add some burn to the sky with the #0 filter for a little more than the base exposure (in other words about a stop of burn on the sky). Burning is where the flexibility of split grade printing shines. I can decide to burn with hard or soft filters or even a little of each. I like the sky soft and not too contrasty so I am burning it with soft (#0) only.
 |
| Test3 f8 #5 16 sec #0 19 sec burn sky #0 26 sec |
Now the darkest part of the sky has come in but not enough. The hillside needs a little darkening and more contrast. I add 1/4 stop to the #5 filter and double the sky burn to 54 seconds.
 |
| Test4 f8 #5 19 sec #0 19 sec burn sky #0 54 sec |
Essentially what must be understood is photo paper has a 'toe' in the response which basically means that it needs a certain amount of exposure to light before it shows any tone. After that there is a linear relationship between exposure and darkening tone. For very light areas it can be difficult to get small amounts of tone without massively darkening the rest of the image.
Now we can see what the left hand strip is in the test strip image near the top of the post is about. This test strip was made using a diffuse light source and increasingly covering the strip at each mark in one second intervals. So from the bottom the first mark shows 1 second exposure to this light source, the next 2 seconds and so on. The left side of the strip remains covered the whole time by a thick card.
The trick now is to look along the strip to see where the paper first exhibits tone. The white section on the left makes it easy to see. Counting from the bottom I see tone emerge at 6 seconds. So I can use 5 seconds to overcome the toe of the response curve.
The result of pre-flashing is inevitable darkening of the entire print but not a lot. So I ran the next test exactly the same as the previous except I pre-flashed the paper for 5 seconds.
 |
| Test5 f8 #5 19 sec #0 19 sec burn sky #0 54 sec Flash 5 sec |
This makes a fantastic difference. Suddenly all the sky details are visible. This is the power of pre-flashing. The inherent overall darkening fits well in the print. Is it a fine print? I don't know, but I get here in 5 prints a pretty satisfactory result. This is a fine start for further explorations and excursions for this negative.
Footnote:
The astute reader will note that in the construction of this print I used pre-flashing whereas Les McClean's tutorial uses post flashing. I have to confess to some initial confusion over the reason for post-flashing. As described above pre-flashing is a known technique to solve the kinds of problems described.
In rereading his passage on post-flashing I think it is meant to serve the same purpose but when done as a post-flash one directly sees the amount of flash required for the actual print highlights. Pre-flashing means that the flash applied to build up just below where tone is visible for blank/unexposed paper. Les McClean applies first the #0 and #5 filter base exposure for the entire image before the post-flashing.
In post-flashing this level is calibrated by the actual highlights that are almost never the same as the unexposed paper. (Because most negatives allow a little light through in even the darkest parts of the negatives which are of course the highlights.) In theory the paper does not care the order of the exposure. In pre-flashing it is clear one is getting the paper above the 'toe' so the following exposure can be made in the 'linear' region. My assumption was the post flash was after all burning, hence my confusion.
Reading between the lines however I believe the base exposures plus post-flash is meant to 'prepare' the paper to receiving the subsequent burns. This makes sense in that having post-flashed (but prior to the burns) means you get consistent/linear response from the paper on subsequent burns. A summary of my thoughts...
- Apply base #5 and #0 exposures as determined by the test images to a paper.
- Extend this by post-flashing where the highlights are examined to stay just under an introduced tone by the flashing.
- Once the post-flash value is determined all later prints have the base #5 and #0 exposure plus post-flash applied to the whole paper. (I suppose once the post-flash values is determined then the order is probably not important however why change and risk a difference. )
- Burn the print according to the burn plan.
Now that I understand better I will have to try this out.


Comments