The Conclave for the Alders
Sometimes you see an image and you feel it will really work. (Update: I should clarify the trees here are not Alders as I suggest but are Hawthorne. They don't get this big often, but I felt something was wrong with my identification, so I went back to gather more data.)
 |
| Image for blog post heading |
Last month I broke out my Fuji GSW 690 and started to take it around with me, when I was just out for a walk or when I had my large format with me. It is a difficult camera to get my head around especially when in the forest. A wide angle on a wide negative, you need to get close to most subjects. But I have gotten some nice images. I wrote up my impressions of the camera here...
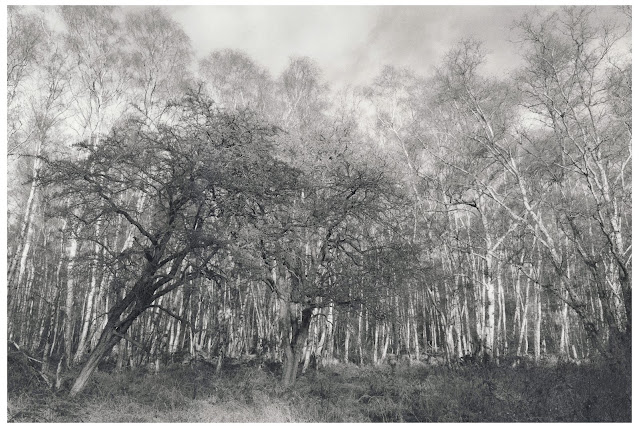
The day was partly cloudy at Holme Fen and not great conditions for photography but not poor either. I was in an area I have been drawn to in the past with these two alder trees. I could never make anything work in any season I was there. The old problem of visual complexity. It is difficult to photograph trees in front of other trees without the trees getting lost in the forest.
This day was different. The low afternoon sun was lighting up the silver birch that forms a backdrop for the scene while keeping the alders in the shade. The alders also have much darker bark, and I could see how this could work. I set up the tripod and kept having to get closer to get the right composition with the wide lens and negative. Meanwhile I watched as the light came and went.
Finally, all set, focused, metered ready to go; I waited perhaps 15 minutes for the right light. I made two images at various times trying for the best light. Not perfect but pretty darn good. I was shooting Ilford Delta 3200 with an EI of 800. I like this combo; it works better than pushing HP5+ which I prefer to shoot at EI 200 anyway. I am technically overexposing the film as conventional wisdom has its true ISO at about 1000. This gives me a fast film perfect for handheld with the Fuji and with the large 6x9 negative any extra grain is negligible. (At least that is my theory anyway!)
Even though I only get eight images on a roll it took me about a month to get through the film (the images are here). I developed the film in HC-110 dilution B using the standard Ilford times for ISO 800.
By the time I developed them this week I had almost forgotten about this image; it being one I took on the first day of shooting. The separation of the alders from the birch was very effective. The negative is a little thin but printable. (I may add a little more development time for this regime.) The silver birch almost circle the alders which creates a small arc of sky at the top.
I had to print this. I have been rhapsodizing about small prints lately so for a change I brought out the Ilford Classic MGFB 16x20 paper. I changed the condensers in 'The Beast' and changed to the 105mm lens for the 6x9 format. I cut the paper into 8x10 sheets. Ran test strips and got to a print I liked.
- f32 Ev 4.1
- #5 32 seconds
- #00 16 seconds
- #00 32 seconds burn above top of alders.
- #00 16 seconds burn corners for slight vignette
I then removed the negative and confirmed the Ev with my Sekonic 308 at the easel. Next, I raised the enlarger head and recomposed and focused the image for the 20-inch-wide paper. (The print image is about 15 1/2" x 18 1/2"). I kept the 3:2 aspect ratio as there was nothing I wanted to crop out.
With the negative out again I measured the light on the baseboard again and adjusted the aperture until I got Ev 4.1 again. This was about f16 1/2. I then repeated the same exposure as I did for the 8x10 print. The result was an exact match. Part of the reason for this is that I cut my 8x10s from the 16x20 paper, so I avoid batch to batch variations.
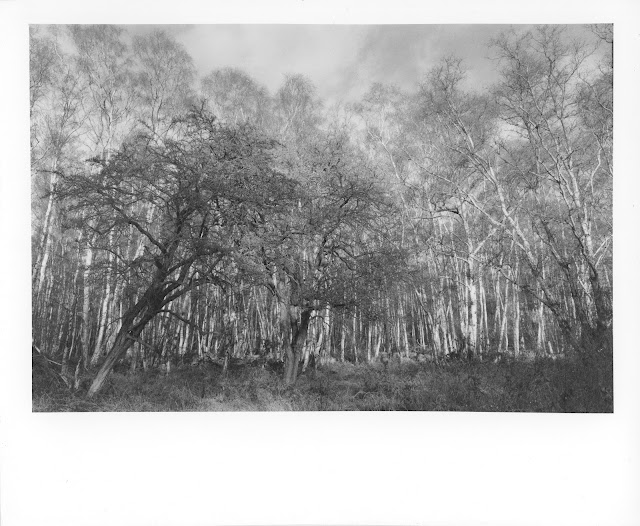
 |
| Final Print (untoned) |
The print is lovely. I have ordered a new mount board to fit the new aspect ratio in an older frame. There is virtually no visible grain at this enlargement which will embolden me to this film even more.
Toning and Washing
I ran a set of experiments for the final form of the print. My thoughts were to selenium tone for more contrast and a very light sepia toning to warm up the print ever so slightly. Sepia (with Moersch MT4 Sulphur toner) toning Ilford MGFB Classic is troublesome as it can lead to a purple or burgundy cast with just a few minutes. Consulting a past blog post it seems one to two minutes might give acceptable results.
I washed and hypo-cleared an 8x1- print and a 16x20 print as follows
- 5 minutes water wash
- 10 minutes hypo clearing agent (HCA)
- 5 minutes water wash.
If you ever wondered what would happen if you tried and tone an insufficiently washed print, look at this one. This is the staining you can expect...
 |
| Poorly washed print selenium toned 2 minutes |
I then toned in selenium toner as follows
- 5 minutes Selenium 1+19
- 5 minutes water wash
- 10 minutes hypo clearing agent (HCA)
- 5 minutes water wash.
I then prepared a 1+100 dilution of the MT4 sepia toner and took it outside. Sulfur toners produce hydrogen sulfide which can be hazardous in sufficient concertation but also will fog your paper. Therefore, I always process out of doors. We have an unseasonably warm day today so it's a good choice.
On the 8x10 print I submerged half in MT4 toner for 1 minute then the whole sheet for the rest for another minute giving half the image at 1 minute and the other half at 2 minutes.
- 1 minute left side MT4
- 2 minutes right side MT4
- Water wash 2 minutes
- HCA 5 minutes
- Water wash 5 minutes
 |
| Sulfur toning test (8x10) 5 minutes Selenium Right side 2 minutes MT4 Left side 1 minutes MT4 |
This went much too far. Good thing it was a test as I hate it! This may be different from expectations due to too much time in the water wash. Sulfur toner works in exceedingly smaller concentrations so even while washing, the print continues to tone, hence the use of HCA to clear the sulfur.
For the 16x20 test print I decided on a thirty second toning and plunged it immediately into HCA. This too resulted in the same color cast though not as strong. As the print has dried the color has muted and does not seem so objectionable.
 |
| Test Print Toned (13x20) |
More Burning?
One part of the print that bothers me slightly is the top of the central alder tree was struck by the same sunlight that the birches are bathed in. The effect in the above prints is to effectively truncate (not unnaturally) the top of the tree as it is lost in the same tonal range as the birch tree tops. Only the darker trunk gives it away to the careful eye.
I looked to see if I could burn this to restore the tone and the top of the tree. I cut a mask with a small hole and tried two different burns, one at 16 seconds #5 filter the other at 16 seconds #00 filter. The result was similar but not enough. I am not sure I can balance the tone enough and still have a natural-looking image.
 |
| #5 Burn Tree Top |
 |
| #00 Burn Tree Top |
Lith Versions
I made some Lith Prints I describe here...
Comments