Printing Holme Fen and Woodwalton Fen: Finally, Back in the Darkroom!
Introduction
 |
| Blog Post Cover Image |
I believe it was back in March that I was last in the darkroom. I know because I have a note on the wall when I mixed a fresh batch of Moersch ECO 4812 developer and my recently finished post on printing one photo from my North Wales holiday which had been last updated April 3rd. Completing that post did not involve any new darkroom work but was merely post-darkroom archaeology and completion of the write-up. Fortunately I kept enough notes to make sense of everything.
Working My Way Slowly to the Darkroom
Yesterday I slowly worked myself into committing to some time in the darkroom. Whatever the cause of the block that has created this long hiatus in my work, I decided I would 'sneak' up on it. It helped that in the previous days I had been out and taken some fresh black and white photos (Also Peak Imaging my 'goto' color lab is now open! Yea! I got some old film and the new roll posted to them this week. I will post those results as well in due course.) Meanwhile I started to collect a few photos I wanted to print. I played with cropping and print sizes using scans and Photoshop Elements. I finally settled on full crops.
Next I thought about paper. Most of the work has some delicate textures and thought of Ilford MG ART 300 paper. I have used this before and have really become hooked on it. It is highly textured being 100% rag cotton paper similar to watercolor paper. It is variable contrast but the emulsion in my experience is slightly warmer.
Sometimes the texture of the paper interferes with the subject so it isn't suitable for every subject. I have also noted with extreme burning of the high contrast filter parts of the texture get more exposure than others and a mottled effect can result. I have only seen this in one case so far however. Finally it is very expensive compared to other papers. 12x16 is a little more the £3 a sheet with 30 sheets to a box while Ilford MG FB Classic is a little more than £2 a sheet with 50 sheets to a box. RC paper is cheaper still.
If you have someone who paints among your friends or family they could use the back side of test prints as a good paper stock. The paper also dries pretty flat without special treatment as well.
Initially I considered cutting in half some 12x16 paper to 8x12. The images are from my Mamiya 645 so has a 3 x 2 aspect ratio which with borders would give me about 7.5 x 10.5. However I found I had a number of sheets of 9.5 x 12 paper. I opted for the same image size which gives 3/4" borders all around.
Now some momentum was building. I setup the enlarger and framed and focused my first image.
 |
| First image is out of focus. Computer says no! |
It was as I suspected earlier however. In the enlarger the tree trunk is slightly out of focus. I know from past experience even being slightly out will bother me to no end. Time to move on to a better image.
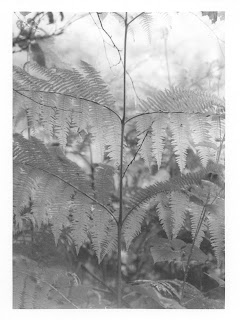
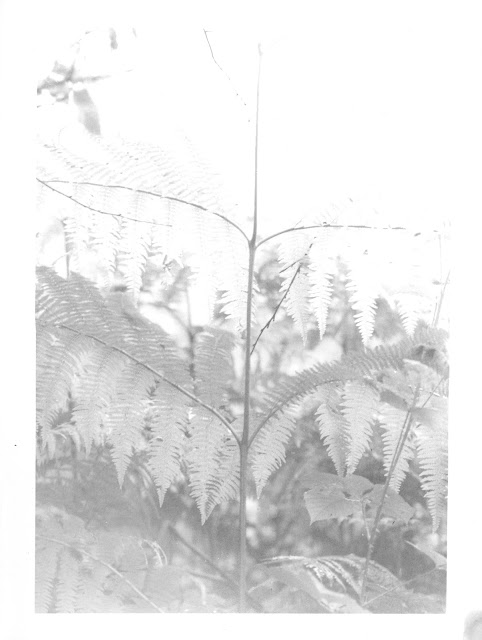
Holme Fen Fern #1
The next image I like because of the symmetry, delicacy, and the range of tone from bottom to top. Printed, the final result offers even more visual interest.
I started out reviewing my evolved printing methodology. I would like to be able to say that after a few months out of the darkroom everything would come naturally. Alas a near disaster in developing the film for this set made me realize a little review would not hurt. Fortunately I have my blog which I can use to review past work. I started here and also some subsequent posts.
With the paper being expensive I do look for some shortcuts to avoid using whole sheets. On this occasion I did not know what brightness to set my enlarger for. I have 2 ND filters as well as aperture to worry about. Fortunately my blog also had some of my past settings for this paper so I could guess that 1x ND and f11 would be a good starting place. I used a little scrap of paper I saved from a previous session to make a filter #00 test strip. I chose a location that had some good tonal range. The result is below...
 |
| f11 test strip starting at 8 seconds on right ending at 64 seconds in 1/2 stop intervals. |
As Don McLean says about the soft test strip.
"When assessing the soft test strip, I look for the first sign of photographic tone in the highlight. At this stage I am not concerned with seeing contrast or tones anywhere near approaching a full black. Contrast and rich blacks are produced when the hard filtration is introduced."
By this guide I settled on 16 seconds which is the strip just to the right of the vertical stem. (As usual with scans I try and adjust them to be true to what I am holding in my hand. The paper is warmer than traditional Baryta papers which have added barium sulfate as a whitener. As with most perception of color however it is only really apparent in direct comparison. To avoid confusion and present the work as realistically as possible I will remove the color content from the subsequent scans. )
I next made a full-size print to assess the soft filter choice across the whole image. This is the result.
 |
| f11 #00 16 seconds |
This looks like a promising start. Sometimes I am inclined to think of this as a wasted step however it is helpful to understand this as almost a map to the entire image. I think of it as my first view of the terrain of the image on a particular paper. This will help me navigate any burning I Will need. As Don suggests, I ignore the lack of blacks confident the hard filter will provide. I am looking for good soft tonal range which I think I have here in this case. I can already see a need to burn the upper 1/3 of the print.
(Ignore the stain in the lower right corner this is from my thumb pulling the print from the developer. I tend not to use gloves or tongs however I am learning that my fingers can stain this paper and Kentmere VC Select paper. I switched to tongs after this point. No bad thing probably.)
I next need to see what the hard filter #5 will do. I made another test print. This time the whole image again at f11 with first a #00 filter at 16 seconds then a range of #5 hard filter intervals from none on the far right of the strip then intervals of 8, 11, 16, 24, 32, 45, 64 seconds. I placed lines in the bottom margin to aid in seeing the exposure intervals for the hard filter.
 |
| f11 #00 24 seconds #5 test strip |
From this I judge 45 seconds for the #5 filter. The paper tends to dry darker and I am not sure how hard a black I want in the image; it is a soft and sensual image I feel. I also decide at this point on a burn plan. I think a while and decide on about the upper third and figure on about 24 seconds. I am combining steps to save time and paper. I will be able to judge the effect of the hard filter separately as the burn does not effect the entire image.
I think I will need at least a stop of burn which is 16 seconds but also want to add more burn to the top and gradually less down the image so about one stop extra would do. It is also useful to have a little extra time on the clock to allow for orientation of the card I use once the enlarger lamp comes on.
 |
| Burn plan #0 filter descending upper third of image. |
I feel I got very lucky as the result I couldn't be more pleased about. When held in hand the image meets my expectations. The tripartite vertical aspect the central divide makes he composition work. The tonal range from bottom to top give it some gravity. The tones particularly in the upper leaf sections retain the sense of being back-lit.
 | |
|
Wood Walton: Birch Bark Gradient
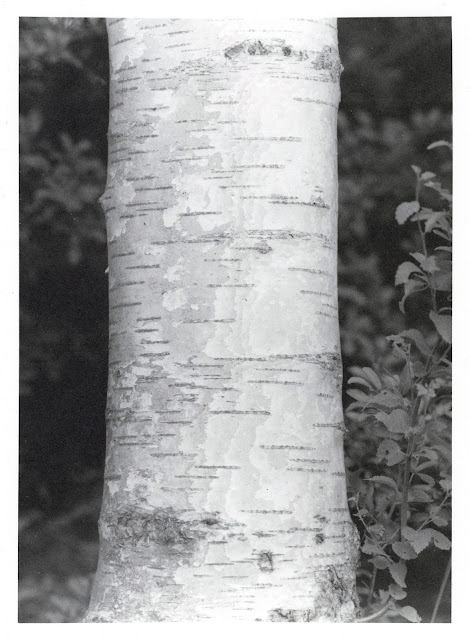
My next image I took at Wood Walton Fen. The birch tree near the trail had this attractive gradient of shading across the bark where layers of bark had weathered. In an engineering sense it looked like a quantization of the grays or from a geographical stand point it looks topographical. In any case I find it attractive. I took two photos and the one here is the one I prefer. It is a simple symmetrical composition with the background really only needed to give some context. It is just as well as the light and shooting handheld means short depth of field.
Again I started with a small test strip for the #00 filter. I worked off the previous print and chose f11 again.
 |
| f11 #00 test strip |
From here I decided on 24 seconds for the soft filter. At the same time to save time and paper again I decided to make the hard filter test strip on the soft filter choice without my intermediate full print (my map in the previous print) with the soft filter. Here is that one.
 |
| f11 #00 24 seconds with #5 hard filter test intervals starting with none at the bottom. |
This showed my poor choice of making my soft test strip o the left side of the tree which was in shadow and hence darker. The right side of the trunk is lighter and missing some tone. Still I can assess both soft and hard filters from this print. I decided to up the soft filter to 32 seconds and use 64 seconds for the hard #5 filter.
 |
| f11 #00 32 seconds #5 64 seconds |
I examined this print before it had time to dry and judged it too light. I then made another print at #00 45 seconds and #5 64 seconds. I was tempted to add a half stop or full stop to the hard filter. There is so little effect on the light tones of the bark with this filter that I think it would have only helped with making the background blacker and increase the contrast of the smaller lines and scars in the bark.
 |
| f11 #00 45 seconds #5 64 seconds |
While this one is fine I feel the previous once it had dried is the print I was aiming for. It retains more range of tone. Indeed I a planned a print with the soft filter a 1/4 stop between at 38 seconds but did not execute the print once I saw the dried version at 32 seconds.
Very satisfying I think. The final print again...
Finally I had at least one more print planned for this run. However I ran out of the 9 1/2 x 12" paper and went to cutting some 12x16 that has been sitting for months in my paper safe. I made a few test prints and after drying was shocked to find the paper is fogged. I thought at first I had not fixed it enough but re-fixing did not help nor did extra washing.
This depressed me enough to call it quits for the day. I will have to see if the rest of the paper in the box is fogged or if this is some very small light leak in the paper safe. A subject for the next post.


Comments