Since the purchase of ColorPerfect/ColorNeg I have had to revise (and improve) my scanning work flow. I have also purchased and read Alex Burke' book
Film in a Digital Age. It is a good book and at 180 pages worth the $20.00 if you practice a hybrid film digital work flow. Lots of practical tips. Alex's photos I think speak for themselves.
Interestingly the two scanning flows are somewhat different and I wanted to compare them. I normally use Vuescan which can be unclear sometimes but has lots of controls. For instance I have scanned for 48-bit color for a very long time. It was only after using ColorNeg that I discovered all my scans were saved as 24-bit files. This is because there are separate scanning and saving options. The tutorials with ColorNeg straightened all this out. These experiments relate to color negative flow.
Alex on the other hand uses EpsonScan and then Photoshop. Reading his scanning flow I decided to see what differences there might be. The recommended flow for Vuescan is to set for 48-bit scans and save as Raw only. This results in a linear scan, that is one with no gamma applied. Most scanners default to adding a gamma (1.8 or 2.2 is common) but ColorNeg works best with linear scans. I also use Image mode as I don't want Vuescan to perform the inversion as you want ColorNeg to do this as that is most of the value.
Balancing the filter layers in the film in Vuescan
Negative film has a strong orange filter cast and for different films this varies. To capture the best dynamic range one can change the gain (or amplification) of each color channel. For Kodak Porta films I settled on Red=1, Green=1.6, and Blue=2. For this experiment I used a very old negative of my brother's that was Kodak Vericolor [6006]. For this negative it scans well with the Porta gains I have outlined here. Using these settings I get the scan below. Note the lack of orange cast and the cyans and magentas are quite visible.
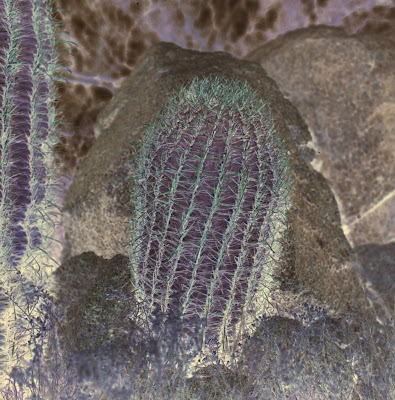 |
| Vuescan 48-bit negative |
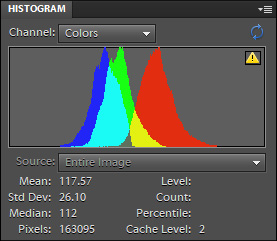
The histogram is as follows and indicates a balance of the gains of the color channels in the image and most importantly little clipping of the highlights and low-lights.
 |
| Vuescan Histogram |
Next I imported into ColorNeg for inversion and then exported it using only the Vericolor correction and not changing any controls. The photo looks very good with natural color and exposure.
 |
| ColorNeg Inversion of Vuescan Negative |
Next I tried EpsonScan. Here I set it for 48-bit mode (only available in professional mode) and positive film. I then tried Alex's flow. I see a problem immediately. In the configuration menu he wants me to leave on color correction. This invokes gamma with no way to turn off the gamma. So I set no color correction and move to the next step. The next step is to set the clipping range of the histograms. However once you turn off color correction all these menus go away (grayed-out). So I make a scan this way as raw is what I want. I get the following. (It turns out according to the ColorPerfect tutorials EpsonScan always enable gamma but ColorNeg can reverse it though presumably the conversion loses some image information.)
 |
| EpsonScan No Color Correction. |
The histogram shows the separation of colors as the gains and clipping cannot be adjusted. Still the histogram is well behaved and all the information is contained in the scan. The color is not fully distributed over the whole range however. This means some of the dynamic range may have been lost.
 |
| EpsonScan No Color Correction Histogram |
Again I imported into ColorNeg for inversion and then exported it using only the Vericolor correction and not changing any controls. The photo looks a little more saturated and shows more contrast. It is also very close to the final images I present at the end.
 |
| EpsonScan No Color Correction with ColorNeg inversion |
Next I tried with color correction on and attempted to defeat the gamma correction (this can't be done apparently). Here is the color correction dialog by default. Note the tone curve is not a straight line. I adjust the white and black triangles below the histogram and straighten out the curve and reduce the clipping. I also selected normal instead of the default soft endpoints on the Tone curve. I did all this in hope of getting a linear and unclipped image. When saving the image however EpsonScan does say in a message box it is saved with sRGB so it will not be linear.
 |
| Color correction dialog before |
 |
| Color correction dialog after |
The scan is as follows.
 |
| Color Corrected Scan |
This is the histogram. Not much different though brighter than the non-color corrected version. There is some spread in the dynamic range particularly the separation of the red channel which might impart more dynamic range.
 |
| Color Corrected Histogram |
This results in a somewhat darker positive image.
 |
| Color Corrected Inversion with ColorNeg |
ColorNeg deals with all these negative scan versions well.
For completeness I also used EpsonScan in Negative mode (it performs the inversion) with color correction turned off.
 |
| EpsonScan Negative Scan (EpsonScan Inversion) No Color Correction |
This resulted in a dark scan but not surprising as no adjustments are made. The histogram reflects this.
 |
| EpsonScan Negative scan (EpsonScan Inversion) No color correction Histogram |
I then used ColorPos to convert the image again with no adjustments.
 |
| EpsonScan Negative scan (EpsonScan Inversion) No color correction ColorPos conversion |
Again a very similar result.
Conclusions
All of these methods produce what I think are acceptable starting points for image manipulation. A jumping off point with reasonably accurate colors where contrast and saturation and other adjustments can be made to capture the mood of the scene at the time. This is not a challenging image having a fairly narrow range of exposure values across the image.
A couple of observations.
- I am more confident in the Vuescan raw mode for ColorNeg work as it is the recommended flow from the folks at ColorPerfect. That being said I think the EpsonScan results would work well as well. (ColorPerfect's instructions actually says that turning off the color correction does not disable the gamma correction. ColorPerfect can deal with this by reverting the correction which is why the results here are OK.)
- EpsonScan does a much better job than Vuescan at negative conversion. In fact before I found ColorPerfect I would use EpsonScan to convert color negatives because Vuescan made such a hash of the conversion and Photoshop wasn't up to it as well. EpsonScan makes a very good low cost alternative and is indeed what Alex Burke uses as the basis for his excellent film work.
Finally I made a couple of attempts to get a printable image from the VueScan and EpsonScan (no color correction) scans above. They are shown below. I treated them much the same in ColorNeg.
I color corrected the image using the top of the rock to take out some blueish cast. I boosted the saturation from 100 to 120. I then adjusted the 'White' slider that affects contrast. This boosts the saturation a bit more and really gives the image punch. I then used the ring CC function and added 1/3 stop of yellow. I tried to use this consistently between the two scans. They seem almost identical. The only thing left to do is sharpen the image.
 |
| Vuescan Final version |
 |
| EpsonScan Final |


Comments