Previous posts showed how I
built and
tested my 8x10 camera. Ugly but it so far works quite well. I have more work planned for it (blackening the interior, adding a landscape mounting, shutter etc) For now I wanted to try real film. As mentioned before 8x10 film is expensive which is why people often use paper negatives or ortho lith film for economy. Silverprint had some Fomapan 100 8x10 on sale so I got a pack of 50 sheets.
Fomapan is popular because it is so economical. It has trouble with being contrasty and it has very high reciprocity failure so is difficult for long exposures. Many people like it in fact and I have learned recently how to tame contrast in film.
I took two photos in my back garden. The first I focused on the chair back and the second the brick wall. I wanted to see about depth of field. I metered the scene at ASA 80 to help with the contrast I would give a slight over exposure and then under-develop the film. Both shots were the same exposure 1/2 sec at f45. I don't have a shutter so again I used the lens cap. This is very inaccurate at this speed.
To develop them I put the negatives one at a time into a Ilford Cibachrome developing drum I bought online. They can be found cheap and will take an 8x10 sheet of paper or film. After the film is loaded and the lid screwed back on the lights can come on for the development process. This style of drum has one problem to be aware of. It is made to work with only 3 oz of chemistry. This means that if you add more the chemicals may leak out of the grey cap which has a hole in the top. I remedy this by putting a piece of tape over the hole.
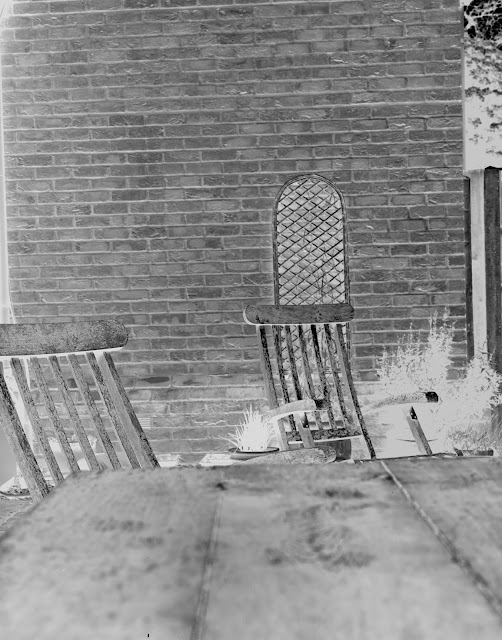
I decided to use HC-110 developer because I have it and it has some effective high dilution recipes. I looked in Massive Dev Chart and adopted a Fomapan 100/HC-110 recipe. The dilution was dilution H which is 1+63. HC-110 needs about 5-6ml for a sheet of 8x10 film. (6ml developer and 279ml of water.) It called for 9:00 minute development time. I deducted 10% to get 8:06 development time. I was concerned that because the drum must be continuously agitated to cover the negative evenly that this would increase the contrast unacceptably. The result was good however. A scan below attempts to show the density of the negative.
 |
| Garden Wall #1 f45 1/2 sec ASA 80 |
I then went to contact print the negative. I ran the usual test strips under my enlarger light at f16 and an enlarger height of 31 cm with my 150 watt enlarger lamp. My first print was straight #5 filter for max contrast.
 |
| Garden Wall #1 #5 54 sec #0 0 sec f16 |
Looks pretty good. I like the range of textures and shading. I also tried for a lower contrast
version.
 |
| Garden Wall #1 #5 23 sec #0 23 sec f16 |
A different look.
I then printed the second negative. At first I tried the same straight #5 filter at 54 seconds like the first assuming the exposure was the same. This came out very under exposed,
 |
| Garden Wall #2 #5 54 sec #0 0 sec f16 |
The negative was quite a bit denser. Not sure if the light changed or if I kept the lens cap off slightly more. So I went up 1/2 a stop and got something closer to my liking.
 |
| Garden Wall #2 #5 76 sec #0 0 sec f16 |
Looking at zoomed images (800dpi) of the two prints reveals their relative depth of field and focus. The chair was about 10 feet away from the camera the wall another 10ft further. A 300mm lens at f45 focused at 10ft gives a little over 4 ft behind the subject and a little over 2 feet in front of the subject.
 |
| Garden Wall #1 zoom |
 |
| Garden Wall #2 zoom |
It is interesting to compare this giant negative to the smallest I have. Here is an 8x10 vs a 16mm scan. the small rectangle on the upper left is the 16mm negative.
 |
| 8x10 vs 16mm negative |
These are two similar crops from 8x10 and 16mm negatives of the same subject, both at 800 dpi. The difference is the distance.
 |
| Crop from 8x10 at 20ft |
 |
| Crop from 16mm at 3ft |


Comments