The lockdown here in the UK has stalled my photography activities. I am not sure why but I am not very motivated in the photography department. I have however enjoyed working in my workshop.
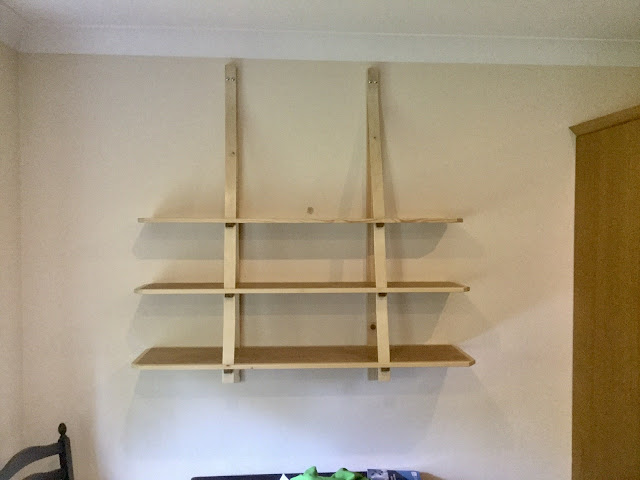
This project started when we were watching some COVID 19 coverage and as we watch some expert talking I enjoy letting my eye wander through the view into their room. In this case I noticed some shelves mounted to a wall with an unusual curved bracket that supported the front of the shelves. They were not particularly attractive but something about that curved support caught my imagination.
 |
| Finished Cascade Bookshelves. |
This got me thinking and eventually I came up with a simple design I hoped would be elegant. I wanted to save money so I used some cheap strips of planed pine (18x44mm) and then bought some finish plywood for the shelves themselves. The pine would supply the wall mount support and when ripped they would also supply the front supports and simple edging on the plywood. The edging is also part of the support for the shelves.
The finished shelves looked like the supports cascade down the shelves like water hence the name.
I bought some 18mm plywood in a 1200x600 (4 ft x 2 ft) sheet and ripped it into 3 widths 250mm, 200mm, and 150mm (roughly 10, 8, and 6 inches). The two supports were placed about 600 mm (2 ft) apart. The are organized narrowest to widest from top to bottom.
The front support is the unique feature of this shelf. It starts at the top of the wall struts and divides to pass over the front of the shelves. This means it has to be a thin strip of wood and bent to conform to the places it has to pass over. I hand ripped them from the 18 mm x 44 mm pine. I selected pieces to be as knot-free as possible and ripped it across the 18 mm width and then planed each piece for flatness.
I needed to bend the wood and experiments showed me I would need to perhaps steam or wet bend the wood as the angles are pretty radical. I constructed a trough to soak the wood for a few days and then constructed a frame to bend the wood to shape. I used an old plank and mocked up the contact points from the top to the fronts of each shelf. I could the clamp the wood to each point until it dried to shape.
I determined well soaked wood wood would bend enough to so I did not need to contrive to steam the strips. Over a period of several days I clamped one strip at a time to the form then dried them for 4 days each before removing them from the form.
The shelves I edged with more of the 18x44 mm pine ripped across the 44 mm dimension. These I glued to the edges. The front edge got some biscuits to help with support. The front edges had rectangular holes 600mm apart where the bent-wood front supports would pass. The rear edges had cutouts to accommodate the rear supports. It is conventional to miter the corners of this kind of edging however I sometimes prefer a butt joint if it is done cleanly. I later decided it would be good to cut off the corners at 45 degrees leaving the edging across the corners. This gives a nice look (detailed photo below). The edging was planed and sanded flush to the surface of the plywood.
 |
Detail of corner edging.
|
Next I had to secure the shelving so it was load bearing. For the front it just needed to bear the load so I would make some small oak pegs punched through holes/mortises in the bent-wood front supports.
 |
Front support peg in place.
|
 |
Front support peg removed to show peg and mortise.
|
The rear was more complicated as I need to support the vertical load and keep the shelf up against the wall. I was concerned the bent-wood front supports would pull the shelves forward and off any support such as pegs like I planned for the front. I eventually contrived small pieces of oak that slotted into the rear supports in a sliding dovetail. The ends of the pieces are square and fit into slots in the rear edging of each shelf.
 |
| Rear support with sliding dovetail in rear support. |
 |
| Rear support sitting in slot cut in shelf edging. |
Fitting the bent-wood front support was the most difficult part and so I finished the pieces with beeswax before assembly. Where the front and rear supports come together at the top I used the only hardware which are some nice looking screws I had.
 |
Hardware to join front and back supports at the top.
|
After the shelves were fitted to the back support with the front support threaded through them I used a square to set the front shelf position where I then marked the slots for the pegs that support the front of the shelf. Once these were cut the whole thing was mostly complete. I fabricated some metal mounts for the back of the rear supports so it could be screwed to the wall.
Thoughts on the project:
I made this in a pretty minimal workshop. I used to own a table saw, planer, drill press, sanding station, and router table. Now I have a homemade router table and an electric drill and a circular saw as my main power tools. I miss most the table saw. Still with patience I can get a lot done with just these tools. Some operations are not quite as precise and require some additional plane or chisel work to get right.
Once I can take out the earplugs, remove the safety goggles and face mask the real enjoyment begins. I put on some music and really enjoy myself. For this project I really enjoyed again listening to Tom Petty's Anthology album. Until he died a few years ago I had not realized how much his music was a soundtrack for my life. Anthology is a selection of his best live numbers from over the years. What a find. Also in the same vein I discovered Jackson Browne's Live Solo album. Intimate and engaging his conversation with the audience adds to the warmth of the music.
The cheap pine is incredibly difficult to work as it is made from quick grown plantation wood and so has a tendency to tear out at the smallest provocation. Because of the numerous knots it is a constant struggle to plane in the right direction. To be fair it is not intended for fine wood working and I did not purchase it for this project. It was sometimes fun to figure out how to use the stuff and I think it turned out well. Ah to be able to afford my favorite wood American Cherry. Probably the best wood to work with power or hand tools. Quality hardwood aside from Oak is very expensive in the UK.
I used the set of Japanese handsaws my wife bought me last year. They continue to be a joy to use. I will probably never return to my western-style saws. They cut fast and accurately with good control. Cutting on the pull stroke seems so obviously superior I am left wondering why western saws still work on the push stroke.
The finish plywood I bought from Wickes is really atrocious stuff. Made in China the finish layer is incredibly thin on the order of a mm or two. This is an incredible feat but the wood used (some tropical hardwood I would guess) and its thinness means it is incredibly brittle. It chips and breaks out at the slightest provocation. The thinness also limits how much sanding it can withstand. Lots of caution and care is expended on maintaining this surface. They use a glue with a bright orange color which I suppose helps with the sorting of the sheets as it reveals voids in the surface. However it also reveals any of these chips in bright color. It is marked as being sustainably sourced but given the lack of integrity from Chinese manufacturers generally I really doubt that it is. I will be looking for better product once this stock has been used.
The following are photos of the finished project.
 |
| Side view after mounting. |
 |
| Front view before installation. |
 |
| Before installation. |
 |
| Side view before installation. |


Comments