Saving Old Paper
The problem with using old photographic paper is it fogs with age. Fogging means that an unexposed paper when developed will not be white, instead it will be some shade of gray. This reduces contrast and makes for muddy indistinct prints. The degree of fogging depends on age and the paper. In this blog I have reported on a range of old papers I have tried. As a word of warning old papers are in general a false economy except perhaps as a first time learning tool. The results are almost always disappointing.
The exception for me was some obscure Spanish a paper I found last year. I was interested in making large prints 16x20" but new paper is expensive. I took a chance on one box and got pretty good results. There is some light gray fogging in the white borders however. (This paper is graded not variable contrast.) In another post I experimented using Potassium Ferrocyanide (pot ferri) bleach to rescue some old and very fogged Agfa paper. This was met with some success but it was a simple experiment. At the end of this post is a little more information about how Potassium Ferrocyanide works as a re-halation bleach.
Now that I have The Beast I have been itching to make some more big prints from 4x5 negatives. Prints from medium format negatives are acceptable at 16"x20" it is the upper limit I suspect for most people. Nerga Portrene is my paper of choice due in part to the price but I also love the paper. The blacks are very black and the texture is very warm and creamy though the emulsion is not warm at all. If I could improve the fogging then it would be even better.
The experiment I performed is simple. Develop an unexposed strip of paper and a fully exposed strip (White and Black). I then drew parallel lines across the back of the paper at equal intervals. I then dunked each strip into the pot-ferri solution up the to the first line for one minute. Then pushed the strip in up tot the next line for another minute. This continued for 5 minutes so the first strip was bleached for 5 minutes up to the next line 4 minutes etc. I did this for both white and black test strips. I wanted black to see when the bleach would impact the black as well.
My pot-ferri working solution is 1+10 of my stock solution which is a Fotospeed formula. (This is not Farmers Reducer which is pot ferri with fixer. I prefer to keep the bleach and fix separate as there is more flexibility.) I will fix separately. Dilution is important as the stock solution works very fast.
In the following results the bottom part of the strip is the unexposed developed section. This illustrates the fog. The marks running to the top showing the bleaching interval. I enhanced the scan to make the gradations more apparent. There is noticeable fogging at 1 and 2 minutes and I think at 3 minutes. So the best bleach time is probably between 3 and 4 minutes. I did the same for the black strip and could not discern any change all the way to 5 minutes (so I didn’t show it here). This is good news. It is probably worth making a gray-scale test strip with half stop exposures and bleaching half at the same intervals. This would inform any impacts on tones.
Next I wanted to try a photo to see the impact on gray scale. I prepared a normal timed test strip and then cut it in half and dunked one half at different intervals in the pot-ferri. The result is below...
Here again 3 minutes seems about right. It looks to give about 1 stop brightening of highlights but leaves the blacks alone.
Now I try different prints to put this to the test. I made the test with one exposure at 22 seconds f11. The photo is unbleached.
I then started with this print to see if I could improve the contrast with the bleach bath. (I fixed it after bleaching.)
The result was very encouraging. There are some white streaks and patches but these are faults with the negative.
I later made a full size print (16x20) in which the 3 minute bleaching worked to greatly improve the contrast. This has become part of my repertoire with the Negra Portrene paper.
I tried the same print on new variable contrast Foma 123 paper without bleaching and got what I think were inferior results. The Foma VC paper never seems to deliver a deep black for me. I did get better result with Selenium toning (1+3) but also got an magenta tone which some might not like. The toning did deepen the blacks. (While I was at it I also tried iron blue toning.)
The exception for me was some obscure Spanish a paper I found last year. I was interested in making large prints 16x20" but new paper is expensive. I took a chance on one box and got pretty good results. There is some light gray fogging in the white borders however. (This paper is graded not variable contrast.) In another post I experimented using Potassium Ferrocyanide (pot ferri) bleach to rescue some old and very fogged Agfa paper. This was met with some success but it was a simple experiment. At the end of this post is a little more information about how Potassium Ferrocyanide works as a re-halation bleach.
Now that I have The Beast I have been itching to make some more big prints from 4x5 negatives. Prints from medium format negatives are acceptable at 16"x20" it is the upper limit I suspect for most people. Nerga Portrene is my paper of choice due in part to the price but I also love the paper. The blacks are very black and the texture is very warm and creamy though the emulsion is not warm at all. If I could improve the fogging then it would be even better.
The experiment I performed is simple. Develop an unexposed strip of paper and a fully exposed strip (White and Black). I then drew parallel lines across the back of the paper at equal intervals. I then dunked each strip into the pot-ferri solution up the to the first line for one minute. Then pushed the strip in up tot the next line for another minute. This continued for 5 minutes so the first strip was bleached for 5 minutes up to the next line 4 minutes etc. I did this for both white and black test strips. I wanted black to see when the bleach would impact the black as well.
My pot-ferri working solution is 1+10 of my stock solution which is a Fotospeed formula. (This is not Farmers Reducer which is pot ferri with fixer. I prefer to keep the bleach and fix separate as there is more flexibility.) I will fix separately. Dilution is important as the stock solution works very fast.
In the following results the bottom part of the strip is the unexposed developed section. This illustrates the fog. The marks running to the top showing the bleaching interval. I enhanced the scan to make the gradations more apparent. There is noticeable fogging at 1 and 2 minutes and I think at 3 minutes. So the best bleach time is probably between 3 and 4 minutes. I did the same for the black strip and could not discern any change all the way to 5 minutes (so I didn’t show it here). This is good news. It is probably worth making a gray-scale test strip with half stop exposures and bleaching half at the same intervals. This would inform any impacts on tones.
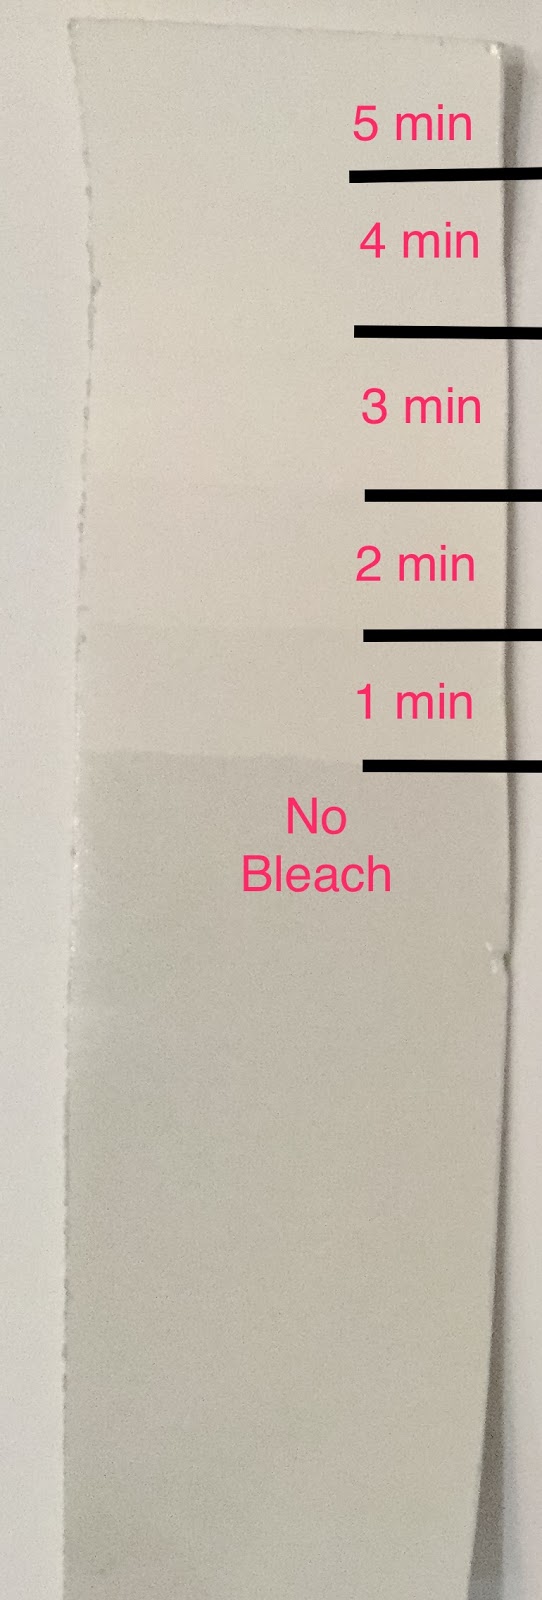 |
| Bleach test strip. |
 |
| Bleach test strip (exposure times right to left and bleaching times top to bottom) |
Now I try different prints to put this to the test. I made the test with one exposure at 22 seconds f11. The photo is unbleached.
 |
| f11 22 sec Negra contact print (unbleached) |
 |
| f11 22 sec Negra contact print 3 min bleach |
I later made a full size print (16x20) in which the 3 minute bleaching worked to greatly improve the contrast. This has become part of my repertoire with the Negra Portrene paper.
I tried the same print on new variable contrast Foma 123 paper without bleaching and got what I think were inferior results. The Foma VC paper never seems to deliver a deep black for me. I did get better result with Selenium toning (1+3) but also got an magenta tone which some might not like. The toning did deepen the blacks. (While I was at it I also tried iron blue toning.)
 |
| Toner Test Bottom: None Middle: Selenium (1+3) Top: Moersch Iron Blue Foma 123 f11 #5 16 sec #0 0 sec |
Re-halation Bleach
Potassium Ferrocyanide is in a class of bleach referred to re-halation. Halation comes form the term halide which is a column in the periodic table. Halides are elements like Iodine, Bromine, Chlorine amongst others. Photographic paper emulsion is impregnated with silver halides such as silver bromide or silver iodine or silver chloride. When light strikes the silver halides the halides are dislodged from the silver leaving a silver ion and halide ion. Development reduces the silver ion to metallic silver and removes the halide.
My supposition about old fogged paper is that time has cause the same effect of light to separate the silver from the halide. Re-halation bleach works by enabling the silver to recombine with a halide. In the case of potassium ferrocyanide bleach it is a solution of potassium ferrocyanide and bromine (a halide). The potassium ferrocyanide facilitates the reattachment of bromine to the silver reverting it back to its original state. Hence the term re-halation.
Re-halation is very useful in photography. In the case of fogged paper it can remove some of the fog and as it acts more immediately on the lighter tones it can increase contrast.
One of the implications is that you can take a fully developed and fixed print and practically bleach it back to whiteness. There will still be a latent image but only of the developed image as the rest of the silver was fixed and dissolved away. You can then redevelop and get the print back. This I can be done in full light by the way. Doing this on a partial basis and using different developers or toners is how you can get interesting NG split-tone prints. I huge topic unto itself. (Look up Tim Rudman’s work.)
Now sometimes this bleach is used to make Farmer’s Reducer which is potassium ferrocyanide bleach and fixer in the same solution. When used on a developed print it can lighten sections but because of the fixer the change is permanent. Sometimes it is called liquid light as it is often used to lighten specific highlights. Use it carefully and sparingly.
One experiment I have not tried is to bleach unexposed expired paper. My theory is that you can re-halate the silver that causes the fogging. The experiment is involved as it requires bleaching and washing the paper and drying it flat, all in the dark. If it works it would be somewhat better than bleaching the finished print as it might not compress the tones as much. I did try this with expired film with indeterminate results. It would bear trying again.
Finally an advanced use of re-halation technique is called SLIMT (Selective Latent Image ManipulationTechnique) for controlling contrast. It works on the strange principle that denser parts of a latent image are more susceptible to bleaching. By using very dilute potassium ferrocyanide solutions you can make use of this selective effect. David Kachel pioneered SLIMT and I hope to someday try it out.
Comments