Fiber Print Drying Method
I have recently started printing on fiber-based paper in the darkroom. I started with RC paper which has the great advantages of speed (lower fix and wash times) and it dries perfectly flat. My referred poison here is Ilford MGIV Deluxe. The reasons to move to fiber are based on the view that most 'serious' photographers in the darkroom use fiber for archival quality. RC works really well I have to say with the biggest hassle of drying prints flat not present. With Fiber paper the paper inevitably curls. It makes in difficult to mount and to store.
I did some research and ran across the usual suspects, blotter paper under stacks of books (can work but really flat prints take days in my experience), wet prints hung back to back (better than nothing), a dry mount press or print drier (serious money), and finally taping the print by the margins to sheets of glass using wet adhesive packing or watercolor tape.
The last one caught my eye. It is clever and uses the wetness of the print together with the shrinkage of the paper to achieve flatness against the glass. Many people in forums testified to its effectiveness. Alas this kind of tape is difficult to find now. There is another downside in that large enough margins have to be reserved on the paper to accommodate the paper tape. So I got to thinking of alternatives. I finally puzzled out a simple system of clamping the prints along the edge in a similar fashion. I also figured out how to make it relatively affordable and dead simple to put together.
I start with a sheet of Plexiglas or perspex and some large paper clips. The clips are the kind used to hold large documents together. They are used to apply pressure to just the edge of the print. The wet paper is placed in the center of the perspex sheet. The perspex sheet has margins equal to the 'reach' of the clips. 4 clamp blocks made of perspex are arranged as a kind of border to the print and overlap the edge of the print by about 4mm when placed flush with the edge of the main sheet pf perspex. The large clips are now arranged around the outside of the border and the clamp blocks secure the edges of the print. Now the print dries as almost the entire surface is exposed to the air. Since the edges are clamped the paper shrinks in tension helping to keep it flat. The perspex I used initially is 6mm thick which works in the prototype.
Additionally it is possible to use this setup like a burnishing plate for glazing a print to a higher gloss. Placing the print emulsion-side down and carefully pressing the air bubbles out between the wet print and the perspex will result in a print with a very high gloss.
(This subject has been updated to include 12x16" prints now on a more recent post.)
My first prototype was for 8x10 prints. The dimensions I used are as follows. This allows a 4mm overlap on the print for the clamp area and works with 50mm (2in) clips as clamps.
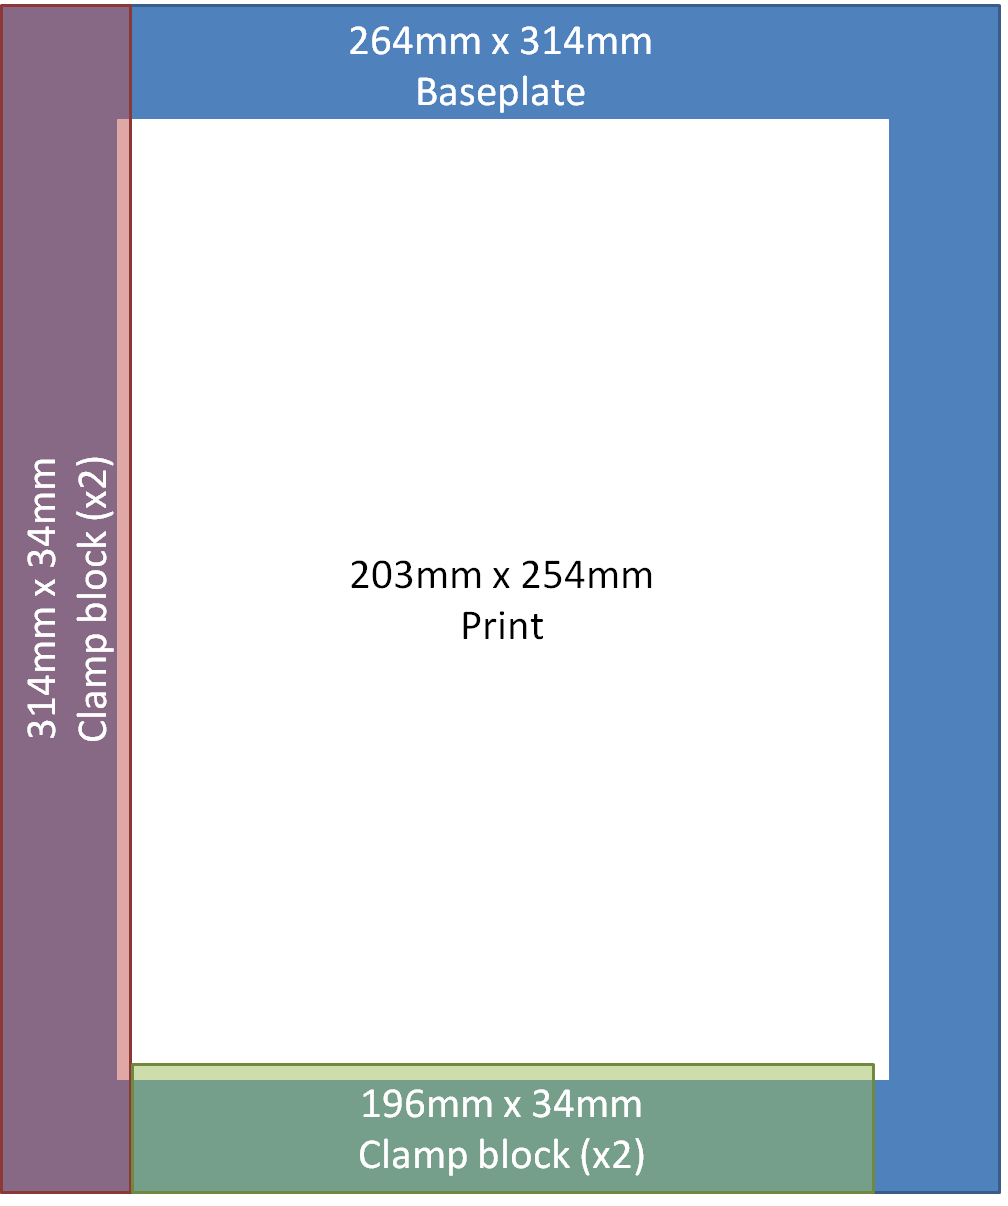 |
| Dimensions for 8x10 drier. |
The parts I got made at an on-line perspex cutting service. There are many vendors about but you should shop around. There are a wide range of prices and shipment costs. I paid about £37 for a set of 4 8x10 driers without shipping at http://www.acrylic-online.co.uk . A set of 12 clips at Staples cost me about £5. That was enough for 2 driers.
 |
| Example of the kind of clip I use |
There are two versions of the explanation . A text and photo version below. and a video here...
Fibre Print Flattening from Doug Morse on Vimeo.
First I use the clamp blocks as a guide for positioning the print on the baseplate. I place the clamp blocks so they overlap the edge of the baseplate by about 4mm. I then lay the wet print against the two edges as closely as I can. It is possible to use the clamps at this stage to secure the clamp blocks if they shift while lining up the print.
 |
| Using clamp blocks as guide for positioning the print. |
 |
| Detail of the alignment step. |
 |
| Squeegee the print. Note blocks have been shifted to overlap the border of the print. |
 |
| Position clamp blocks flush to the edge of the baseplate. |
 |
| Ready to clamp |
 |
| Clamps in position. Note the top and bottom ones do double duty of clamping more than one clamp block. |
 |
| The Dried Print |
Update: I have now succeed in using the same process for 12"x16" prints. Link Here.
Comments
Is there any reason you couldn't put a print on each side of the frame if you had larger clips that could accommodate the extra width?
I want to try it on 12x16 next.
Do the acrylic blocks not leave a imprint in the paper's edges?
The block make an imprint that results in the border being more glossy.