iPad Enlarger Project
Introduction
I had recently read how someone had placed their iPhone into an enlarger and printed photos from it. I don't have an enlarger so this got me thinking. Can I use an iPad as both the light source and negative?
Well I had an old Deckel-Munchen shutter lens assembly I picked up on eBay. It is quite fast at f2.9 and comes from a medium format 6x9 cm camera. Now the iPad screen is quite a bit bigger than this but large format lenses are very expensive. I would be operating the lens near its limits. Since the lens has a diaphragm and shutter it is self-contained in terms of image brightness adjustment and ability to time the exposure. Since paper is slower than film the plan was to operate the shutter in B or bulb mode with a cable release. The lens also has a focus adjustment for fine focusing.
Another impact on image quality is of course pixels on the iPad. The retina display however features 264 pixels per inch which is very close to the 300 dpi minimum recommended for digital prints. And these may not be visible depending on the quality of the lens.
Construction
Next a series of optical calculations were needed to get the dimensions of the enlarger right to have a chance of capturing a decent sized image in focus. The lens is 75mm or about 3". I wanted a range of from 1/2 to 2x magnification knowing that perhaps the lens would not make 2x without significant vignetting.
So the distance from the lens to the iPad screen needs to follow the following equation. B=(M+1)F where B is the distance to the iPad screen, M is magnification, and F is focal length. So the range of motion is 4.5" to 9". To accommodate this I build a telescoping box with two dado slots for the iPad to slide into. The slots are 3" apart and the length of the telescoping portion is 4" to allow somewhat more than 3" of sliding range.
This telescoping box is then mounted to slide on a rigid post with a board to project the image onto. This is the focus. The inside of the box is painted flat back to limit internal reflections as these will combine in the lens to reduce the contrast. The lens was mounted on a brass sheet lens-board and the outside of the lens-board and box facing the photographic paper was also painted black. Light reflected from the image on the paper will reflect back onto the paper fogging it during the exposure and again reducing contrast. A better solution is to use black felt or flocking.
The result is shown below.


The post the enlarger head rides up and down on is visible. Another plywood box is built to tightly hug the oak post for rigidity. Don't underestimate the stiffness required to keep the image plane parallel to the base as the enlarger head is quite heavy when the iPad is installed.

Here is a view into the enlarger head. In the center is the lens on the lens-board. Next is the edge of the telescoping box and above that are the two dado slots the iPad rests in. The right side of the box is cutaway with a replaceable section where the iPad is loaded. The section is then replaces to seal in the light. Limiting light-leaks is critical as the iPad is left turned on in the sealed box while the paper is manipulated in the dark.

 Here the iPad is in place.
The was all constructed with 1/2" and 3/8" plywood. the dados were cut with a 1/2" router bit to half the thickness of the wood. The post is oak roughly 2"x4" which is set in a dado in another piece of oak of the same dimensions. The base is particleboard. Screws are used to assemble it. It was constructed from material I had lying around my shop.
The Results
Next I needed a negative. I started with a black and white photo. This one is St Paul's Cathedral in London. It was taken with a Yashica MAT 124G TLR (Twin Lens Reflex) camera which takes a 6x6 cm image.
The film used is Ilford Hp5+ 400 ASA processed with Rollei RHS developer. The negative was then scanned and made to a positive and then level and contrast were adjusted in Photoshop. The result is below.
Next the iPad brightness was set to maximum. It turns out that reasonable exposure times could be achieved with less that full brightness however the slider on the iPad to adjust the brightness is not calibrated so setting to max allows for more consistency. The diaphragm in the lens can be used to set the level for a reasonable exposure time. It is also useful to place the iPad into airplane mode to void pop ups and make sure your calendar is clear. The iPad sleep timer should be set to at least 5 minutes so it does not shut-off in mid-exposure.
I use the iPad photo library to display the photo though any photo app could do.


Here is a closer view of the enlarger projection of the negative. The perspective shift is due to this photo being taken at an angle. The red light is from an appliance below the enlarger.
Next I then ran some test strips to get the exposure timing right. I was using Ilford ILFOBROM GALERIE FB Grade 2 Gloss paper. The results below are using an f5.6 at 4 seconds. There is quite a lot of exposure latitude in the system as higher f stops can be used to lengthen the exposure if need for dodging etc.
The result below was pleasing for a first pass. There is evident vignetting meaning the entire screen at full resolution is not visible. Also since I started with a high contrast image/negative and used grade 2 rather than grade 1 paper the image is quite contrasty. Here is where more Photoshop work or different paper grades come into play.

Image Quality Comments
As if the whole process outlined above were not perverse enough, (Analog film, scanned, digital positive, digital negative, digital projection, wet processed analog paper print) I then chucked the dried print into my scanner again (that was of course how I got the photo above posted). I scanned it to 3200 dpi. What could I see?
First thing to note in a zoom on the colonnade that the the tones in the galleries are present as seen below. This was quite gratifying. If one clicks on the photo to see full resolution however you will also notice pixels! These are from the iPad.
More pixel detail is seen below.
Finally the image below reveals the scanner pixels and the pattern of iPad pixels. The iPad creates gray from a combination of red green and blue for the human eye to perceive. The photographic paper is sensitive mostly toward the blue end of the spectrum (hence why a red safelight does not fog it). The modulation of intensity across ipad pixels is due to this difference in sensitivity. So the lighter areas across the pixel are likely where the red pixels are and the dark areas are blue and green. The darkest is likely the blue section. Another point to note is careful counting of scanner pixels gives about 12 pixels per iPad pixels which at 3200 dpi gives 3200/12=266 very close to the 264 dpi of the iPad3.
I attempted to overlay the two images. I had to rotate the iPad color photo as I believe the dark rows in the iPad photo correspond to the light columns in the Pixel in Pixels image (remember the paper prints white as black and white as black). It is difficult to see below but this seems reasonable.
Other Topics
Clearly if there were a darkroom app then many of the steps in terms of timing of the exposure and focusing could be automated. It might also be possible to couple to an iPhone for remote control since you cannot see the iPad display while in use. It may also be possible to display a red version of the negative to aid focusing with photographic paper present though I think this is fraught as LCDs leak light off axis.
It should also be possible to use the iPad as an enlarger lamp and use the enlarger with film negatives. They will suffer with pixel print-through unless a diffuser is used or some means is used to vibrate the iPad enough to smear the pixels. This might have an advantage of using images with light and dark areas instead of all white. This could introduce digital dodging and burning.
I had recently read how someone had placed their iPhone into an enlarger and printed photos from it. I don't have an enlarger so this got me thinking. Can I use an iPad as both the light source and negative?
Well I had an old Deckel-Munchen shutter lens assembly I picked up on eBay. It is quite fast at f2.9 and comes from a medium format 6x9 cm camera. Now the iPad screen is quite a bit bigger than this but large format lenses are very expensive. I would be operating the lens near its limits. Since the lens has a diaphragm and shutter it is self-contained in terms of image brightness adjustment and ability to time the exposure. Since paper is slower than film the plan was to operate the shutter in B or bulb mode with a cable release. The lens also has a focus adjustment for fine focusing.
Another impact on image quality is of course pixels on the iPad. The retina display however features 264 pixels per inch which is very close to the 300 dpi minimum recommended for digital prints. And these may not be visible depending on the quality of the lens.
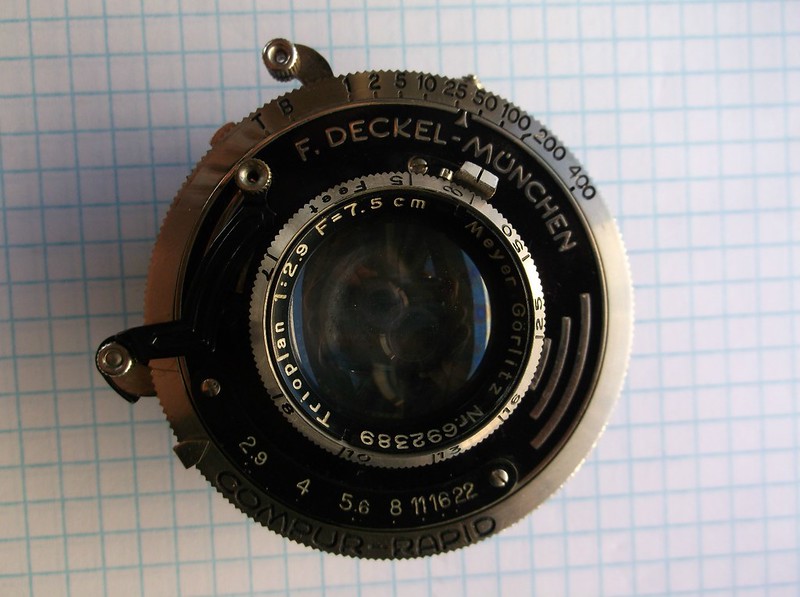 |
| f2.9 Trioplan Lens |
Construction
Next a series of optical calculations were needed to get the dimensions of the enlarger right to have a chance of capturing a decent sized image in focus. The lens is 75mm or about 3". I wanted a range of from 1/2 to 2x magnification knowing that perhaps the lens would not make 2x without significant vignetting.
So the distance from the lens to the iPad screen needs to follow the following equation. B=(M+1)F where B is the distance to the iPad screen, M is magnification, and F is focal length. So the range of motion is 4.5" to 9". To accommodate this I build a telescoping box with two dado slots for the iPad to slide into. The slots are 3" apart and the length of the telescoping portion is 4" to allow somewhat more than 3" of sliding range.
This telescoping box is then mounted to slide on a rigid post with a board to project the image onto. This is the focus. The inside of the box is painted flat back to limit internal reflections as these will combine in the lens to reduce the contrast. The lens was mounted on a brass sheet lens-board and the outside of the lens-board and box facing the photographic paper was also painted black. Light reflected from the image on the paper will reflect back onto the paper fogging it during the exposure and again reducing contrast. A better solution is to use black felt or flocking.
The result is shown below.
 |
| The lens mounted on the lens-board with the cable release attached. |

Here is a view of the enlarger box form below. Note the box-within-box construction. The Allen key and screw are tightened to lock the telescoping portion in place when the desired zoom is adjusted.

The post the enlarger head rides up and down on is visible. Another plywood box is built to tightly hug the oak post for rigidity. Don't underestimate the stiffness required to keep the image plane parallel to the base as the enlarger head is quite heavy when the iPad is installed.

Here is a view into the enlarger head. In the center is the lens on the lens-board. Next is the edge of the telescoping box and above that are the two dado slots the iPad rests in. The right side of the box is cutaway with a replaceable section where the iPad is loaded. The section is then replaces to seal in the light. Limiting light-leaks is critical as the iPad is left turned on in the sealed box while the paper is manipulated in the dark.

Here is a view from the side showing the dados for the iPad.

The was all constructed with 1/2" and 3/8" plywood. the dados were cut with a 1/2" router bit to half the thickness of the wood. The post is oak roughly 2"x4" which is set in a dado in another piece of oak of the same dimensions. The base is particleboard. Screws are used to assemble it. It was constructed from material I had lying around my shop.
The Results
Next I needed a negative. I started with a black and white photo. This one is St Paul's Cathedral in London. It was taken with a Yashica MAT 124G TLR (Twin Lens Reflex) camera which takes a 6x6 cm image.
 |
| Yashica MAT 124G TLR |
 |
| St Paul's Cathedral (HP5 400 ASA) |
This photo was then sent to the iPad where an app (InfiniFX) was used to make a negative. (Below) What I neglected to do for this first image was to flip the image 180 degrees horizontally to compensate for the lens. Any text would be rendered unreadable if it were present.

I use the iPad photo library to display the photo though any photo app could do.

Here is what the image looks like in the enlarger. Note of course the circular image but also the fact it vignettes near the edges and eclipses the corners. The lens is not the best for this application. As mentioned it is designed to image a smaller negative.

Here is a closer view of the enlarger projection of the negative. The perspective shift is due to this photo being taken at an angle. The red light is from an appliance below the enlarger.
Next I then ran some test strips to get the exposure timing right. I was using Ilford ILFOBROM GALERIE FB Grade 2 Gloss paper. The results below are using an f5.6 at 4 seconds. There is quite a lot of exposure latitude in the system as higher f stops can be used to lengthen the exposure if need for dodging etc.
The result below was pleasing for a first pass. There is evident vignetting meaning the entire screen at full resolution is not visible. Also since I started with a high contrast image/negative and used grade 2 rather than grade 1 paper the image is quite contrasty. Here is where more Photoshop work or different paper grades come into play.

St Paul's Cathedral
Here is another print this time of St Martin's in the Field at Trafalgar Square in London. This was processed with less contrast in the digital negative and with it flipped left to right prior to printing.
 |
| St Martin's in the Field |
Image Quality Comments
As if the whole process outlined above were not perverse enough, (Analog film, scanned, digital positive, digital negative, digital projection, wet processed analog paper print) I then chucked the dried print into my scanner again (that was of course how I got the photo above posted). I scanned it to 3200 dpi. What could I see?
First thing to note in a zoom on the colonnade that the the tones in the galleries are present as seen below. This was quite gratifying. If one clicks on the photo to see full resolution however you will also notice pixels! These are from the iPad.
 |
| Colonnade Detail |
| Pixels Between Columns |
| Pixels in Pixels |
 |
| iPad3 Pixel Pattern |
| iPad pixels scaled and overlaid on scanned pixels. |
Clearly if there were a darkroom app then many of the steps in terms of timing of the exposure and focusing could be automated. It might also be possible to couple to an iPhone for remote control since you cannot see the iPad display while in use. It may also be possible to display a red version of the negative to aid focusing with photographic paper present though I think this is fraught as LCDs leak light off axis.
It should also be possible to use the iPad as an enlarger lamp and use the enlarger with film negatives. They will suffer with pixel print-through unless a diffuser is used or some means is used to vibrate the iPad enough to smear the pixels. This might have an advantage of using images with light and dark areas instead of all white. This could introduce digital dodging and burning.
Comments
oh, and ... http://petapixel.com/2013/09/03/enfojer-analog-darkroom-printing-digital-smartphone-photos/ ... looks like someone else had a similar idea.
cheers ...