A little whole back
I posted about an experiment I tried using 35mm film in my SINAR Zoom 6x12 film back on my large format camera.
The idea was a success however I really wanted to print and mount a photo from this to discern the real impact. I do like to photograph and scan my work but I get the most satisfaction from printing the work and making it presentable.
In this case I got to combine a few different ideas I have had over the years.
Printing
I started out with one of my test images. The first one I chose did not have enough interest for me when I made a test print.
 |
| First Choice |
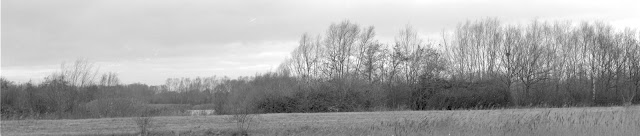
I went to the other version which was taken with a wider angle lens and held more interest in the foreground. Apologies for these scans as they are not the best. In particular the shadows are blocked up. (The print is much better!)
 |
| Final Selection |
The largest easel I have is 16x20 and I chose Adox MCC 110 paper. It is a variable contrast fiber-based paper. I have only recently begun to try this paper out. It turns out his resurrected paper is made on the prototype coating line in Switzerland. You can
hear about this from Lina Bessonova here...
Allowing for 1/4" borders meant a piece of paper 20x5 inches. I made a simple straight print using my usual split grade process. The next step was to flatten the washed print. My n
ormal setup for drying prints is setup for conventional paper dimensions. However I had already decided how I would mount the print and would follow something similar to
a simple technique I show here. This allowed me to combine the two things into one.
My simple mounting/framing technique starts with a sheet of Masonite somewhat larger than the photograph. In this case I decided to use this Masonite to clamp my drying print to using the same perspex-bulldog clamps I normally use. This then set the Masonite dimensions at 2 inches larger than the print in each dimension. So 22x7 inches.
I placed saran wrap (cling film in the UK) over the Masonite then put my wet print on top and arranged my clamps around the edges. I then placed the assembly on the floor where I have underfloor heating for it to dry.
 |
| Print Drying and Flattening |
Once the print was dried I trimmed the edges for consistent borders. In my mounting method the full print is shown so consistent borders are important.
The Frame
I wanted to make a variation on my original mounting idea. I would use thinner (12 mm vs 18mm) Masonite then use some trim called
hockey I used in another framing project. I painted the Masonite a slate gray while the trim was painted a different color to improve visual interest. The hockey helps thicken the frame and stand it off the wall for the mounting hardware. (I struggle with good color schemes and being under-confident veer towards black or white, safe but boring...)
I glue the frame and backing together adding small corners to strengthen the frame. Then I add the loops screwed into wood blocks glued to the frame.
 |
| Back of finished frame with reinforced corners and loops for hanging. |
 |
| Front of finished frame |
Mounting the Print
Next I mount the print to the surface of the painted Masonite using 3M PMA (Positionable Mount Adhesive).
 |
| With photo mounted |
Hanging the Print
I then tie the cord between the two brass loops. I always struggle with getting the cord tied tight enough or when it has stretched re-tensioning it. I found a solution. I use a simple wire tie to make the connection and can then use its ratchet action to adjust the tightness. It works really well.
 |
| Tied side of the hanging cord. |
 |
| Wire-tie tensioner. |
Finally I hung it in the downstairs bathroom (toilet UK) beneath a mirror.


Comments