Posts

Showing posts from February, 2021

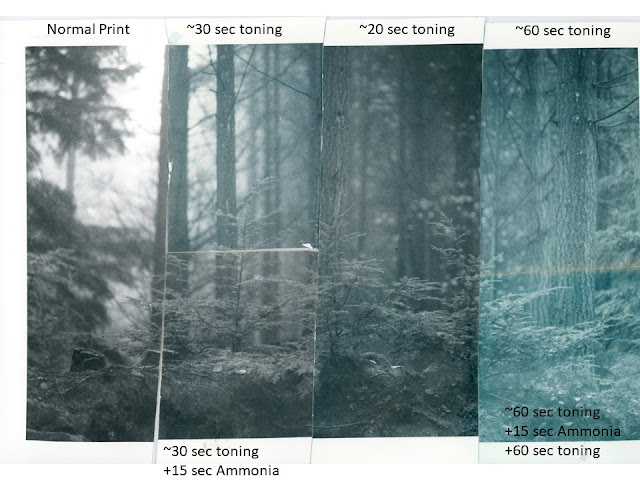
Mathematical Trees Study

Image
Since my series of posts on the Mathematical Trees prints   I had given some thought to the idea that there might be other compositions or viewpoints that might give up different interpretations of the image. I was stymied by the idea that what worked was the snow on the ground in terms of the making of a minimal image. Failing snow in the weather forecast I filed the idea away in my head.  This morning I was up very early relieving myself and peeked out the window as there was fairly bright light with the full moon. There was a thick fog apparent so I set my alarm for a couple of hours hence. As I fell asleep I laid my plans to make a quick return visit. The alarm sounded and I quickly got dressed and hurriedly gathered my gear.  A little too hurriedly it turns out as I left my tripod plate on my Fuji 690. The fog was thick when I arrived and perhaps a little too much. It was cold about -3 degrees C. I brought one roll of Ilford FP4+ as I wanted to be back home for breakfast. I had my

Wye Forest Blue Toning

Image
Introduction to Iron Blue Toning I got a few acceptable prints from the Wye forest printing session. I decided to try some blue toning. I have found that blue toning works well in foggy forest scenes.   I use the Moersch MT4 Iron Blue toning kit. The kit is simple in that it has 4 parts that you mix with distilled water. There is also a clearing solution to mix. I mix all this as single use. I tend to make 500ml for 8x10 prints which works well in small trays. The toner doesn’t last long about an hour or two.  I always start with my old test prints to establish tone and timing. Blue toner changes color under different conditions. With denser/darker images the blue is less apparent and more cyan in lighter toned images. Length of time in the toning solution also effects the tone as more silver takes up iron. There is a sharp break for instance between 30 seconds and 60 seconds. 30 seconds delivers an understated dark blue tone while 60 seconds is much stronger.  You can also move the t

Holme Fen Water’s Edge Print

Image
On the tail end of the roll of Ilford HP5+ (ISO 800) that the Wye forest print series came from were some photos I used to test my Mamiya 645 Pro mirror fix.  One photo of these I liked and so printed it.  The day was cold windy and sunny. Holme Fen is very subdued in terms of mood in these winter conditions.  However at the edge of a pond I found a simple elegant image.  In printing this the high contrast creates some challenges. I printed this on Ilford MGFB Classic again. I ran test strips and a test print. This got me close with #00 16 seconds #5 8 seconds. The highlights are fairly blown in the grass on the right and left side of the tree trunks where the sun strikes directly as well as the water in the lower right corner.  Print 2 #00 16 seconds #5 8 seconds My mind turns to flashing the paper. I have a strip of the same paper that I ran a flash test strip at 1 seconds intervals on as a reference. I also noted the Ev of the flash light I used at the time. This was Ev 2.6. )My fl

Wye Forest no3 Prints

Image
 This is the final print in the series that starts here (yes strangely at no2 print).  This is yet another soft image from a foggy day which provided a challenge to print. Because the negatives are so thin in this series being HP5+ pushed to ISO 800 I opted to intensify this one by soaking it in Selenium 1+3 toner for about 5 minutes. This usually helps bring up density and particularly increases contrast. (I first did this here and Andrew Sanderson has a good blogpost on intensification here .) Never-the-less the better prints were made with little to no soft filter.  Original negative left Intensified right (slightly darker) These small trees were on the edge of a road cut about eye level. The light streamlining through the gap in the trees on the left lit them with a soft light. The short depth of field was forced because of the low light and being handheld. Most of the images I took that day were in the range of 1/30 to 1/60 second and f4 to f8. In the end the print works well de

Wye Forest no1 Print

Image
Another in this short series on printing some images shot in the Wye valley. A foggy day and a wide open lens led to some very soft images that have a different look than I am accustomed to.  This image is one where what I visualized was not what ended up on the negative. I saw this glimpse of light in the depth of the forest and the outline of some trees there. However as is often the case in forests there is a strong light from the bright, though foggy, sky. This lit up some of the red cedar boughs in the upper right and the ferns in the foreground.  In order to recover what I was seeing at the time from the negative I must do some creative burning to keep the eye focused on the central subject. These prints I made on RC paper Ilford MGIV RC. I didn't think the image was very promising and I have a small stack of the RC paper I haven't touched in some while. Here is the first print after test strips.  

Wye Forest no2 Print

Image
The Wye forest series is from a short trip to the Wye valley on a foggy day. Since the primary purpose was a walk I was shooting my Mamiya 645 handheld and HP5+ pushed to 800. The result was some very soft images due to the wide aperture, the fog, and film grain.  The prints are a challenge as a result. This was another exploration of the range of possible prints that lead me eventually to a different image than I would have settled on if I had proceeded in my usual fashion.  I started out with test strips and my first test print of a #00 filter at 8 seconds and #5 filter 8 to 64 seconds in half stops.  This lead me to the first print at #00 at 11 seconds and #5 22 seconds. This is more or less what I was after. The darker tree trunks are a little too dark and so another print (4) I reduce the #00 filter to 8 seconds and have a better version.  Print 1 #00 11 seconds and #5 22 seconds Print 4 Exploring by 'Going Too Far' So much for the conventional direction. I ‘go too far’ ne

Creativity Motivation and Serendipity

Image
  I have created a video version of my three part blog post about a recent image I printed in the dark room. 

Mamiya 645 Pro Mirror Stop Fix

On YouTube recently Nick Carver posted an excellent video about how to fix an endemic problem on the Mamiya 645 Pro/TL cameras. I had come across this a few months ago on Reddit and at the time had a quick look at my 645 Pro and it looked fine. The stop was there and I have not had any issues with focusing so I filed it away in the back of my mind. Until I came across Nick’s video. The video is really well made and takes you through the issue and the fix.  The issue is a small plastic piece that the mirror falls against when it returns to position. This piece breaks with use and often this results in misfocussing. Fortunately some clever soul had this problem and made a design for 3D printing and posted the result on Thingiverse a repository for 3D printable designs. Here... I downloaded the design and sent it to a local 3D printing company. I had to order a lot as they have a minimum order. I am offering them for sale on eBay in the UK for the cost of the part and postage as a serv

You guessed it! More cards.

Image
It has become a bit of a habit now. After a session in the darkroom I take my better images and make notecards with them. Originally I did this as I had offcuts and scraps that were too numerous to become mere test strips. Now I make the notecards with more intent. They are useful and make good gifts. This time around I made some on Ilford MGFB Classic paper and I cut three sheets of 12x16 paper into six 4x8" strips that I will fold in half to make 4x4" cards. My latest negative was already in 'The Beast' from yesterday's printing session. I had to raise the easel up to the lens to get an almost 1:1 image. At 3.5 inches (8.9cm) long the print is basically the same size as the 6x9cm negative. I could have contact printed it but that is a lot of trouble without a frame and I worry about handling a negative too much.  One criteria I have for cards is to make the printing simple. This means I avoid images that require a lot of dodging and burning.   Enlarger Setup It