Pimping my Intrepid MK3--Bellows Extension Compensation
Amongst the seemingly endless list of skills and tasks I need to understand and master is the subject of bellows extension compensation. This subject is covered in many places but I can summarize here.
On a camera with any kind of bellows one has to compensate for the extension of the bellows as one gets very close to the subject. Recall that the distance from the lens to the film plane is defined by its focal length when focused on a subject at infinity. (This gets more complicated with the compact retrofocus optical designs of 35mm lenses.) As the subject gets closer to the lens then the lens needs to move farther from the film plane. On large format cameras and many medium format cameras (like the Mamiya C220/330 TLRs) it is possible to extend the bellows very far to get very close to the subject. As the lens moves further from the film plane more of the light falls outside of the film plane. This means a correction of more exposure is required. (A readable paper on the subject is found here.)
My style of landscape photography emphasizes intimate landscape which can include closer subjects. Until now I have ignored bellows extension compensation, not fully understanding it, and having seemingly gotten away with it. However I have read enough about it recently to decide to pay it some heed now.
The above referenced paper created tables for use to make the compensations. The proposal is to use a tape measure and the table in the field to make the necessary calculations. This seems clumsy to me and leave me with more stuff to juggle and organize.
 |
| Table for bellows extension calculation |
In Alec Burke's excellent eBook Film in a Digital Age . He recommends a simple calculation dividing the bellows extension by the focal length of the lens and and squaring the result to get the extra exposure multiplier factor. He suggests estimating the bellows extension visually. This depends on mental arithmetic.
I had in mind something like what I had on my Mamiya C220. It is very clever (and complex though easy to use) as it handles interchangeable lenses. Below is a photo of the camera with the compensation scale visible. The colored lines/curves are for specific lenses and the compensation is read off the vertical scale.
 |
| Mamiya C220 with bellows extension compensation scales shown. |
My situation with the 4x5 camera is simpler as I have fewer lenses and only 2 that I would consider for closeup work. I rule out my 90mm lens and so that leaves 150mm and 210mm lenses. My Intrepid camera only supports bellows extension out to about 300mm (310mm actually) so that limits the range to compensate for.
The other thing I learned through experimentation is that any photo I would take from my tripod with legs extended to the ground requires virtually no compensation (hence the reason it hasn't caused me any trouble yet!)
We can calculate the minimum distance to a subject with this handy formula. (Hat tip Tim Layton.)
1/F = 1/D + 1/B
Where F = Focal length, D = Distance to subject, and B = Bellow extension or draw. For me this is pretty straight forward. Take the 150mm lens and knowing my max bellows extension is 300mm I get
1/150mm = 1/D + 1/300mm
D=300mm or about 12 inches. The subject magnification would be 1:1 as given by the following formula where M = magnification ratio, B = bellows extension, F = focal length of lens.
M = (B-F) / F
M = (300mm-150mm)/150mm = 1 or 1:1
For my 210mm lens I get
Minimum subject distance D = 700mm or 28 inches
Magnification is .43
The Solution
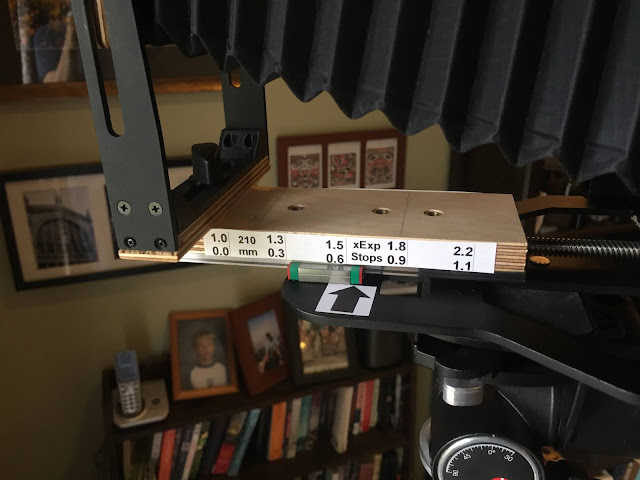
I setup my camera on a tripod and selected my 150mm lens and focused on infinity. The Intrepid has different places to mount the front standard on the focus base. The one second from the front ( I will call this the back mount) gives me focus at infinity and good bellows extension to about 275mm. Being able to use this mount and the front mount complicates the solution but I found a compromise. There is an argument for using the forward mount as a close subject mount point to maximize bellows draw to 300+mm. For the front mount I measured the distance between the two mount points at 41mm. I could add a second indicator arrow 41mm behind the first for the front mount. The same scale would apply.
 |
| Focus base details |
Next I needed to fashion a scale for the compensation. I used Alex Burke's formula and made a simple spreadsheet. I reasoned that 25mm (1 inch) intervals would suffice for accuracy. I included a multiplier column and the stops equivalent as each might useful depending on the situation.
 |
| 150mm lens bellows table |
Next I designed the scale with 25mm intervals and the numbers from the table above. The strip is about 10mm high to fit the edge of the focus base plywood.
 |
| 150mm bellows scales |
 |
| 150mm lens minimum extension (back mount) |
 |
| 150mm lens maximum extension (back mount) |
 |
| 150mm lens maximum extension (front mount) |
 |
| 210mm bellows scales |
 |
| 210mm bellows scale |

Comments