I decided to break out the Moersch MT 4 Sepia toning solution and give it a try.
I am usually not a fan of warm tone prints or sepia toned prints. It is a just
a matter of personal taste but it is always worth exploring things outside of
your own creative sphere. (This is the smelly form using sulfur (or sulphur if
your are from the UK.)

|
Moersch MT 4 Sepia Toner
|
The article is really part of an overall discussion on toning and bleaching
with the linked section focused on sulfur toning. Here are some things
I gathered to aid in understanding of what is happening.
1) Sepia toning converts silver metal in the print to silver sulfide.
(Silver sulfide is actually the compound in the tarnish on silver objects
like tableware.)
2) Silver sulfide is more stable chemically then metallic silver so this can
make prints archival.
3) Selenium works by converting the silver to silver selenide. This too is
archival.
4) Sepia toning works in very high dilutions (1+20 to 1+200 even 1+1000) and
has a long shelf life.
5) Working In high dilutions means it continues to work in the washing step.
This is either useful or a nuisance.
6) Sepia toning can be stopped with a sulfite bath which is another name for
hypo clearing solution. This makes sense as hypo clearing is used to remove
thiosulfate compounds from a print.
7) Sepia (and other Selenium) toning works slowly in converting the silver.
Typically the highlights convert first and the shadows later.
8) The slow conversion means that the effect develops over time and
depending on the dilution. These can be used to control the process.
9) Converting an image completely to sepia will reduce the contrast as the
deep blacks will turn brown.
10) Bleaching with Potassium ferrocyanide can be used to alter the
process.
11) Sulfur and Selenium are in the same column on the periodic table so have similar properties. Tellurium is just below Selenium and historically has been used for toning with reportedly a red tone. There seems to be nobody working with this now. Someone reported to on a forum that Wolfgang Moersch could not get Tellurium to work as a toner.
First Test
I mixed up a liter at a dilution of 1+100 or 10 mL toner to 990 mL of
water. (5mL is about 6 grams BTW.)
I started with an old test print from a prior printing run. The paper is
Ilford MG Art 300 paper developed with Moersch Eco 4812 developer. This
results in a neutral black image. The old test print was printed too light
and without all the necessary burning in the final print required so has
some obvious flaws.
I always struggle with conveying image tone and exposure in scans. Toning
is particularly difficult as the color shifts can be subtle and like all
perception of color and white balance it is linked to color temperature of the lighting and the environment. For these first images I assumed I could
take a simple iPhone photo and get consistent results. Unfortunately it
seems the images were slightly different in white balance. Suffice it to
say the images shown give evidence of a change in color but are not
accurate.
The test was in three phases. I used shortened and not archival washing
sequences for expediency as these are tests.
Phase 1 - Sepia Toning
-
Hypo clear wash 5 minutes followed by water wash of at least 5
minutes.-This is to make sure fixer was cleared. These were test
prints so were not thoroughly washed.
-
Tone in MT4 1+100 for 3 minutes. -This time was my arbitrary choice
based on what I had read from the documents above. They use a higher
concentration but shorter times.
- Wash 2 minutes
- Hypo 5 minutes
- Wash 5 minutes

|
Phase 1 with un-toned test strip for reference.
|
This first test gave a subtle shift to a warmer tone only made apparent by
comparison to an untoned image. In fact my first impression was hardly any
difference until I made the comparison.
You can see in the photo above that the print appears green on the left
shading to almost pink on the right. This is entirely due to the lighting
and the camera's color balancing. As I write this I and try to explain this
color shift I concluded that this may be due to me wearing a blue and
green shirt and so where my body blocks the light this is dominant where
as the pinker areas are where the overhead lights may be striking
directly. The phone tried to make sense of it and I got this result. I
attempted to rebalance the color in Photoshop but the results were still
confusing as the image does not have these 2 tones but the photo does.
Phase 2 - Bleaching
- Wash 5 minutes
- Bleach in potassium ferrocyanide 1+9 1 minute
- Wash 5 minutes

|
|
Phase 2 Bleaching
|
Again hard to tell anything from the photo. What was apparent to my eye
was the browns increased dramatically. Crucially this is because some
(though not all) of the pure silver was removed from the image. This left
fewer cool black tones and so the warmer sepia dominates the image
more.
- Phase 3 - Selenium Toning
- Selenium tone 1+19 for 5 minutes
- Wash 5 minutes

|
Phase 3 Selenium Toning
|
This is my 'archival' toning dilution which might deepen blacks but does
not shift the color much. It seemed to do little to regain the cooler
tones that were bleached away and seemed to move the image towards
red/pink tone.
Second Test
So I got the feel of it with the first set of tests. I clearly wanted to
be more systematic. This time I took another test print. Again not the
correct final print so this one was over-exposed in the high contrast
filter and was not burned properly to balance the foreground.
I cut the print into 6 roughly equal-sized pieces. I then washed them in Hypo
for 5 minutes then a water wash for 5 minutes. I then placed one in the MT4
1+100 toner for 2 minutes before putting the next in for 2 minutes
etcetera until I had all 5 in. I kept the 6th piece aside as a reference.
The result is individual pieces of the image toned for 10, 8, 6, 4, 2, and 0
minutes.
This turned out to be a very useful exercise as I can use it to judge the
level of sepia tone I want for an image.

|
|
Sepia 1+100 Test 10, 8, 6, 4, 2, 0 minutes
|
It amazes me how the un-toned image can appear much colder and almost blue in
the presence of the warmer tones. I perceive that beyond 8 minutes there is
little shift in tone and that 2 and 4 minutes are the most interesting. (I actually pasted these segments onto some card and made the requisite notes so this can serve as a reference for toning in the future on MG ART 300 paper.)
Test 3
My next step was to apply the results from above and see what I could achieve
on another old test print. This is the same image though a much lighter print.
I chose to tone it at 4 minutes. Again my steps were...
- Hypo clear 45 minutes
- Wash 5 minutes
- Tone 1+100 4 minutes
- Wash 2 minutes with one dump of the water.
- Hypo clear 5 minutes
- Wash 5 minutes.

|
|
Intermediate Sepia 1+100 4 minutes
|
|
|
Intermediate Sepia 1+100 4 minutes with Comparison
|
The above two photos are the toning only result. The first is the isolated
image the other is the same image photographed alongside the earlier
result to aid in comparison. Both were photos taken outdoors under a bright cloudy
sky.
The next step was to selenium tone the image with a 1+3 concentration. This
concentration tends to give more radical color shifts.
- Selenium Tone 1+3 4 minutes
- Wash 5 minutes

|
|
Sepia 1+100 4 minutes Selenium 1+3 4 minutes
|

|
|
Sepia 1+100 4 minutes Selenium 1+3 4 minutes comparison
|
Again two versions of the same image here. The selenium gives a pinker color
edging towards lavender. It isn't far off the previous image that was bleached
and selenium toned but they are different when held side by side. I think this
image is higher contrast which makes some sense if the bleaching replaced some
of the black silver with warmer selenium tones.
Finally I compare the two different images in one photo. The sun came out so
my phone and hand shadow are evident now :).
Test 4: Fern
My next test I chose another old test print this time a fern and the test
print had a base exposure for the soft filter and hard filter test print. In
many ways these are ideal for these kinds of tests as they show a great range
of image tones.

|
Test 4 Original Scan
|
I am experimenting with sequences of steps and timings. Here I wanted to
pre-tone just a little with selenium, then bleach the remaining silver back
a little then sepia tone moderately. Finally I redeveloped in ECO 4812 my
conventional developer to add cool tones back to the remaining silver. I took
snapshots just before the ECO redevelopment.
Sequence as follows
- Hypo Wash 5 mins
- Wash 5 mins
- Selenium 1+3 30 seconds + drain time
- Wash 5 mins
- Bleach 1+9 30 seconds + drain time
- Wash 5 mins
- Sepia 1+100 2 minutes
- Wash 2 minutes
- Hypo 5 minutes
These are 3 sets of images of the same print, two as before and I added
an overlay of a soft filter test strip to show color change.

|
Test 4 with Selenium, bleach, and sepia steps
|

|
Test 4 with Selenium, bleach, and sepia steps comparison with straight
sepia test image.
|

|
|
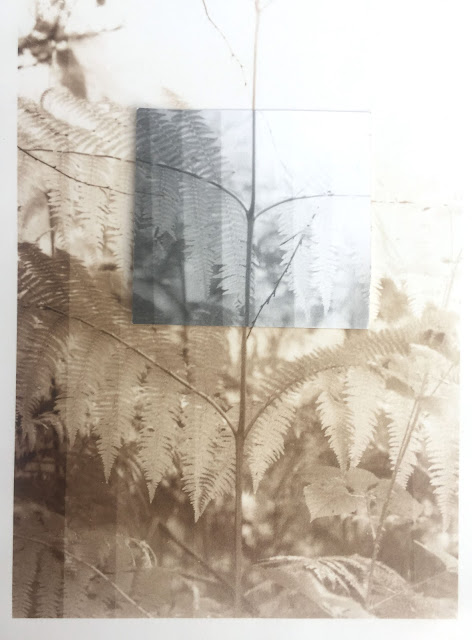
Test 4 with Selenium, bleach, and sepia steps with overlay of
conventional developed image
|
The next images are with Eco 4812 developer (3 minutes) and wash as a final
step.

|
|
Test 4 with ECO 4812 redevelop
|

|
|
Test 4 with ECO 4812 redevelop comparison
|
|
|
Test 4 with ECO 4812 redevelop overlay
|
The change is pretty subtle but there. I looked at histograms of the areas of
both images and there is a greater blue channel in the ECO developed image. I
put them side-by-side below and the difference is more apparent.

|
|
Test 4 pre-ECO left and ECO redevelop right
|
Test 5: Fern again
The base image here is a soft filter only test print is rather faint.

|
Test 5 Original Image
|
With this test, which may have been defeated by its faintness, I wanted to try
and keep more silver back for redevelopment so I went with more bleaching (longer)
and shorter sepia. I have only 2 photo sets of the steps. One set is after
selenium toning and then the full process.
Sequence is as follows.
- Wash 5 minutes
- Hypo 5 minutes
- Selenium 1+3 30 seconds + drain time
- Wash 5 minutes
- Bleach 3 minutes
- Wash 5 minutes
- Sepia 1+100 30 seconds
- Wash 1 minute
- Hypo 5 minutes
- Wash 5 minutes
- Eco 4812 3 minutes
- Wash 2 minutes
First set of images shows lavender tones of selenium step.

|
| Test 5 Selenium |

|
|
Test 5 Selenium Comparison
|

|
|
Test 5 Selenium Overlay
|

|
|
Test 5 Selenium Bleach Sepia ECO
|

|
|
Test 5 Selenium Bleach Sepia ECO comparison
|

|
|
Test 5 Selenium Bleach Sepia ECO overlay
|
I didn't capture it but the sepia toning stage was quite yellow and the
redevelop with ECO 4812 did tame this quite a bit. So in principle successful
however I was hoping for something more dramatic. I think that there was not
enough silver to work with as the original image was so faint; so the results
were always going to be very subtle.
Ilford MG Classic FB Paper Sepia
I ran a similar test matrix on an test print I recently made on Ilford MG Classic fibre paper. The image was probably not the best for this test as it has a lot of sky so judging what happens in a range of tones is difficult. Still it shows similar results though the tone is pinkish under some artificial light to my eye. The most noticeable gradations are at 2, 4, and 6 minutes. The 8 and 10 minutes toning times did not seem to add much (to the sky anyway). I again made a reference card from this for future use. Here it is...
 |
Sepia MT 4 on Ilford MGFB Classic at 10, 8, 6, 4, 2, and 0 minutes
|


Comments