Large Format Contact Prints
A couple of my recent black and white prints from Holme Fen I decided to contact print. I don't contact print often so my methodology is not refined or honed by practice. I use my enlarger and printing easel and just add a sheet of plain window glass to sandwich the negative to the paper.
Since I had two negatives I wanted to print them at once to save some time. I arranged the negatives on a sheet of Ilford MGIV Classic FB paper. A further complication is that I do split grade printing generally and making two test prints simultaneously present a slightly greater challenge as I had to expose for soft and hard filters. I considered just digging out my grade 2 filter but resolved a method to get split grade printing to work.
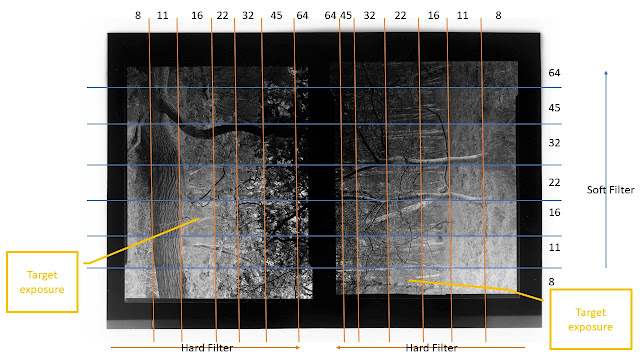
First I would make the test print with the soft (#00) filter from one direction across both negatives. Then I would make the hard filter (#5) test prints orthogonal to the soft filter intervals by using two black cards to block each strip of exposure incrementally. I had to to move each one at the same time but reasoned I was at least coordinated to do that. Alternatively I could have covered one image while I made the hard filter test strips then alternated to the cover that image while exposing the previously covered image. My more complicated first method saves an additional minute of time under the enlarger.
 |
| Test Print Exposure Method |
Below is the test strip result at f16 Ev 4.9 ISO 100.
 |
| Contact Print Test Strip |
Now I picked the best intersection of the hard and soft filters for each image. For the oak tree it was #5 16" and #00 16" while the birch trees were #5 22" and 00 8". I then setup contact prints again and this time I set my enlarger first for the oak exposure and made that exposure while I covered the birch tree side of the paper. I then set the enlarger for the birch tree exposure then covered the oak tree side before starting that exposure. I then developed and fixed the paper. The prints are pretty much exactly what I wanted for each one. I decided to not do any burning or dodging. Here is the first result...
 |
| First Contac Print with dust and white/gray space between prints |
There is small spec of dust on the oak tree trunk and I also did not like how my covering card overlapped between the two images making for the white space between them.
I made a second print exactly the same but tried to more exactly align the two images and made sure my covering card during each exposure did not overlap in the center thereby avoiding the white line. My intention is to frame these as a pair with black areas and rebates visible. A simple white matte board can be used to finish the framing and clean up any crooked or wonky edges.
 |
| Final Print as envisioned with matte. |
Comments