Introduction
In other posts I have
documented my use of Cibachrome drums which are designed to develop 8x10 sheets of Cibachrome color print paper. Cibachrome has not been made since 2009 so these come up often. I also found the motor unit that rotates the drum.
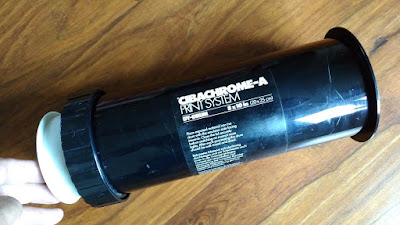 |
| Cibachrome Drum |
 |
| Drum with Motor Unit |
I originally bought this to develop Cibachrome from expired paper and chemicals (
See link here.). Eventually I made us of it to develop 8x10 film as a cheap developing tank. For 8x10 you roll the film up emulsion facing inside so that it lines the inside of the drum. This is done of course in complete darkness. The lid is then screwed on and after that the rest of the operations can happen in normal room light. The lid has a small reservoir that holds about 250 ml of chemistry. You fill the reservoir with the developer while the drum is upright. The the drum is laid on its side and rotated. (I would roll it along the kitchen countertop until I got the motor unit.) The chemistry is then released into the drum and there is enough liquid that it covers the film as it rotates through the bottom of the drum. The developer is emptied after the development time then stop bath is poured in and rotated, then emptied and fixer is added and rotated for the required times. The drum can then be opened, and the film washed.
At this point I had only experimented with large format (both 8x10 and 4x5) without much commitment. For my 4x5 developing I started with the ‘taco’ method in my Paterson tank but didn’t like it. I ended up just placing the 4x5 film on the inside of the tank wall and found I could get 2 sheets of film in that way. I would use inversion to make sure the film was covered. This worked well enough but when I got the Cibachrome drum and motor unit I thought it would be better to use that as I didn’t have to agitate the film manually.
With the Cibachrome drum I would again place the 4x5 film again against the inside wall of the drum with the emulsion side in. This worked pretty well except that removing the film was difficult and once or twice I scratched the emulsion. It was not acceptable to have a system that could ruin the film. What I needed was some kind of film holder that would make it easier to load and unload the film. I made a couple of prototypes, but I think this one is the simplest solution.
The Film Holder
I start with a sheet of scrap 8x10 film though any sheet of plastic film would work. Plastic film will not react with chemicals. I mark out the outlines for two 4x5 film sheets on the 8x10 film. I then cut tabs around the periphery of the 4x5 outlines. These tabs are then folded inwards towards the 4x5 outlines and I crease them. These tabs will hold the film sheets in place. Once the 4x5 film sheets are positioned between the tabs with the emulsion side facing upwards, the 8x10 sheet with 4x5 films can be rolled and inserted into the drum, the lid screwed on, and then the lights turned on. The development proceeds as outlined above. Chemistry will flow easily over the film.
The only issue I found at first is that the anti-halation dye is not entirely washed off as the chemistry can’t easily reach the back of the film. This is alleviated by dimpling the back of the 8x10 sheet that holds the negatives in place.
My first test revealed some bromide drag/turbulence issues around the folded-up tabs. I alleviated this by cutting the tabs much shorter and making my
drum motor reversible.
Update: I recently encountered more surge marks after having no issues for a few years. I discuss this further
here.
The drum motor is not required, and I have developed a lot of film just rolling the drum back and forth on the countertop though it is tedious.
 |
| The Setup |
 |
| The Film Holder |
 |
| Film in the Film Holder |
 |
| Inserting into the Drum |
 |
| In Position Ready to Develop |


Comments